

This is a guide specifically for Auxiliares de Conversación
You finished the NALCAP renewal process and have just received your Carta de Nombramiento. Now, you can finally renew your TIE.
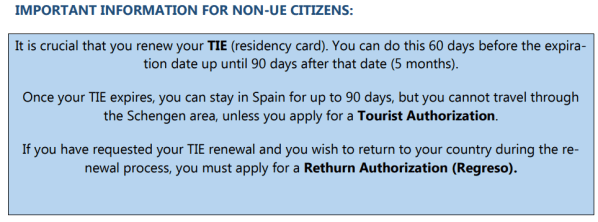
In order to remain in the program, it is essential to renew your TIE (if it is your first renewal) or apply for a new visa from back home over the summer. Both options are valid, but I’m sure you remember how difficult the visa process was.
There is a new law that went into affect on May 20, 2025. This law change only permits one renewal of your TIE for auxes. That means, if you wish to stay a 3rd year, you would have to go back home and apply for a new visa.
I am not a lawyer, and I am definitely not an expert in legal matters. Please, do your own due diligence.
What is the official language that constitutes this change?
“En el caso de los supuestos previstos en las letras d) y e) del artículo 52.1, solo se permitirá una prórroga por autorización. En el caso de las letras a) y b) de dicho artículo, se permitirán hasta dos prórrogas por autorización.“
In the case of the circumstances provided for in letters d) and e) of Article 52.1, only one extension (TIE renewal) per authorization (visa) shall be allowed.
Auxiliares would fall in the category “e”.
Brief overview of the process:
- Apply for a digital certificate (anytime during the year and before your TIE expires.)
- Receive your Carta de Nombramiento for the following school year.
- Apply for Prorroga online.
- If you wish to go back home over the summer, apply for a Regreso. This will allow you to return to Spain while your Renewal is being processed (maximum of 90 days).
- After receiving a positive response to your application, complete your Toma de Huellas appointment at the province where you will be living next school year.
- After about 40 days, finish the process with a Recogida de TIE appointment.
Renewing Authorization of Stay and TIE
You can start the renewal process after you receive your Carta de Nombramiento and at a maximum of 60 days before the expiration date of your current TIE.
Your TIE can be renewed up to 90 days after its expiration. If you wait any longer, you will have overstayed your visa. The only alternative to renewing your TIE is applying for a fresh visa back home.
Being able to stay in Spain past the expiration date does not mean you can leave and re-enter Spain. For that you would need an unexpired TIE, an unexpired visa, or a regreso (this is covered later).
This is the first year after the new immigration laws went into affect. Visas now can extend past the expiration date of TIEs. Historically, travelling on an expired TIE without a Regreso meant forfeiting your right to renew your TIE.
Without precedent and specific language in the law, I am unsure how the differences between visa expiration dates and TIE expiration dates will be handled. If you want to play it safe, do not leave Spain with an expired TIE unless you either:
- Have a Regreso or
- Plan on applying for a new visa back home
If you have any specific info on this matter, please contact me.

If your TIE expires during the renewal process, do not worry. It is completely normal. You are allowed to stay during the renewal process.

During the renewal process and after your old TIE expires, you can apply for a Regreso to have permission to leave and return to Spain within a 90 day period. This would allow you to visit your family during the Summer. If you plan on staying in the U.S. for the entirety of the Summer break, you would exceed the 90 day permission and would need to apply for a new visa from the U.S.
Before you buy your flight, please know that you need your Carta de Nombramiento to even start the renewal process. Only after you apply for prórroga (TIE renewal) can you receive a Regreso.
The TIE renewal process will be similar to your first TIE application with a few key differences. During the process, however, they will take your old TIE before providing you with a new one. I recommend saving a digital copy of your old TIE.
Requirements
Step 1 – Submit Documents Online with a Digital Certificate (Prórroga)
During this step, you will apply online with a digital certificate. You will receive a resguardo (a type of receipt) which can be used for your Regreso. In the Online Prorroga Application PDF the “receipt” mentioned IS the resguardo.
There used to be means of applying in person for this step. Ever since the law change, everything was moved online. DO NOT TRY APPLYING IN PERSON.
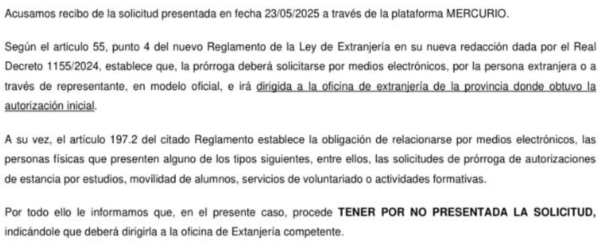
Ojo! Make sure you know where to send your prorroga (renewal) application.
Article 55, section 4 of the new Regulation of the Immigration Law
“La prórroga deberá solicitarse por medios electrónicos, por la persona extranjera o a través de representante, en modelo oficial, e irá dirigida a la oficina de extranjería de la provincia donde obtuvo la autorización inicial.”
“The prórroga must be requested electronically, either by the foreign person or through a representative, using the official form, and it must be addressed to the immigration office of the province where the initial authorization was obtained.” (the province where you first got your TIE).
Make sure to apply accordingly.
Below are the requirements:
- Apply Online
- New and Old Carta de Nombramiento
- Tie
- Passport
- Completed EX-00 Form
- Tasa 790-052
- Certificado de Aprovechamiento
- Proof of Health Insurance***
***The insurance policy for NALCAP participants starts on October 1st and ends May 31st (or end of June if you are in Madrid) which means you will be uninsured for 3-4 months during the Summer. Having health insurance is a requirement to apply for renewal. Your carta de nombramiento states that you are insured during the program, so showing this will be enough for almost all regions and bureaucrats.
Unfortunately, depending on your region and luck, you may be required to purchase insurance over the Summer. This will be discussed more in the health insurance section.
Step 2 – Fingerprint Appointment (additional requirements)
Consult your Prórroga Status
(Start step 2 after receiving Resuelto-Favorable)
Due to a new pilot program, you may automatically receive an appointment for this step.
Automatic TIE Appointment System
Once you receive your “Resuelto-Favorable” notification, you can start the next step: the Toma de Huellas appointment. The official language states that this process must be done within a month of receiving the notification. Personally, I have not seen strict enforcement of this rule (just like with the initial TIE application), but don’t dilly dally!
“En el plazo de un mes desde la notificación, el extranjero deberá solicitar personalmente la tarjeta de identidad de extranjero en la Oficina de Extranjería o Comisaría de Policía de la provincia donde se encuentre.”
Within a period of one month from the notification, the foreigner must personally request the foreigner’s identity card (TIE) at the Immigration Office or Police Station of the province where he or she is located.
Inclusion.gob.es (Prorroga de Autorizacion de Estancia por Estudios)
Bring the previous documents from step 1 with you (besides the EX-00 and previous Tasa). After receiving a favorable outcome in step 1, you will have your fingerprints taken. Below, you can find the additional documents you will bring. Again, please bring your previous documents from step 1.
- Get an Appointment
- Prórroga approval letter “Resuelto-Favorable” original + copy
- Empadronamiento + Copy (within the last 3 months)
- Foto de Carnet (New+extras)
- Completed EX-17 Form + Copy
- Tasa 790-012
This is where you pick up your new card about 40 days after your fingerprint appointment. Make sure to bring your appointment confirmation, passport, old TIE, and resguardo. During this appointment, they will take your old TIE to be shredded.
Step 1: Submit Documents Online
Like everything, please double check the requirements through official sources.
Prórroga de estancia por estudios (inclusion.gob.es link)
You will submit your documents online with a digital certificate.
Since you are applying for prórroga with a digital certificate, you will have to scan all the required documents including a scan of your TIE (front and back).
Guide to Applications Online with a Digital Certificate
The information provided in this link is specifically for university students renewing their TIE, but the vast majority of information is relevant for auxes. I will elaborate more in the “Apply Online” section.
How to get a Certificado Digital
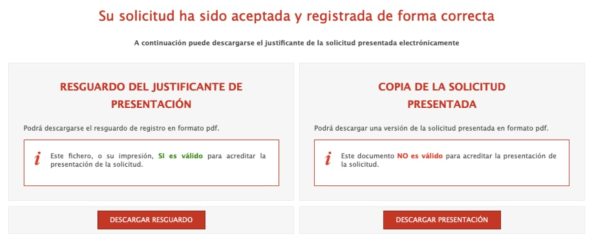
During the application, you should receive a número de expediente and a resguardo (a receipt of your application).
The número de expediente is a sequence of numbers that will allow you to track your application status online, and the resguardo is a document that serves as proof that you successfully submitted your documentation. You will need it to apply for a regreso during the TIE renewal process.

Here is a quick guide to your status (Katy Crestol and Becky Kates):
Source: 2021-2022 VLC TIE Renewal Guide

“If there is something wrong with or missing from your application the oficina de extranjería will get in touch with you to let you know (I believe with a letter in the mail, unless you’ve got a certificado digital or cl@ve and marked on your EX-00 form that you’d like to receive electronic notifications).
Either you’ll get this type of letter in the mail OR, if your application was all good, you will get another letter stating that your application has been approved (your “resuelto favorable letter” aka “approval letter”) You will then need to take this letter with you to your toma de huellas cita.”
Once you receive your positive result, move on to Step 2: Toma de Huellas.

Apply Online
Step 1:
Applying online: If you have issues with the web portal, you can always try on a different web browser.
Guide to Applications Online with a Digital Certificate
The information provided in this link is specifically for university students renewing their TIE, but the vast majority of information is relevant for auxes (not everything will be exact, so please read the options you select carefully before submitting). I also include additional info below.
How to get a Certificado Digital
(your current TIE must not be expired)
Required Documentation
EX-00 Form (Completed through Mercurio – Online Form)
TIE (Front and Back)
Passport
Old and New Carta de Nombramiento
Certificado de Aprovechamiento
Tasa Modelo 790-052 (Paid)
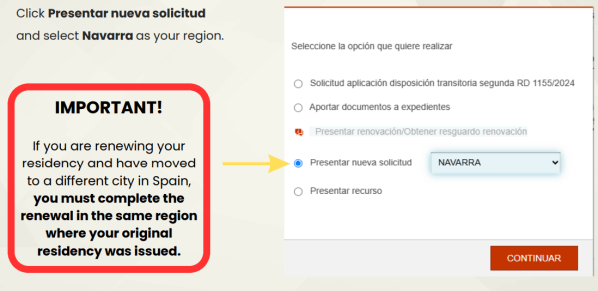
Make sure to apply at the province where you originally received your TIE (new law – May 20, 2025).
During the process if you receive the error “No ha sido posible validar el certificado en CL@VE, Compruebe que el certificado es valido o intentelo mas tarde.”, try clearing your cache and cookies, opening Mercurio in a different web browser, or using incognito mode.
You will select “Presentar nueva solicitud”.
Later on, you will fill out the EX-00 form online.
EX-00 Form (This is a link to a guide on the online form for auxes. FOLLOW THE INSTRUCTIONs CAREFULLY FROM THE EX-00 FORM LINK.)
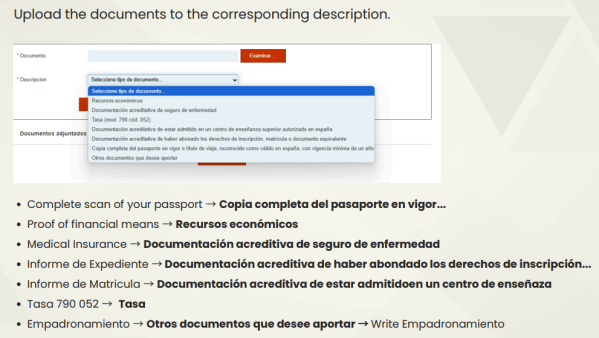
When you submit your documents, make sure to include all the listed requirements posted above. Remember that your Carta de Nombramiento covers multiple requirements (such as proof of financial means and insurance).
If you are limited by the amount of “otros” you can use, you may have to combine files. Just make sure your files are labeled correctly in Spanish and are well organized. (Attach all the previously mentioned required documents).
Mercurio expires very quickly, so try to be efficient when uploading your documents. Additionally, there is a maximum threshold for file size, so you may have to compress some files.
After submitting your application, you should see a screen like this.
Carta de Nombramiento
Step 1:
Make a scan of your new and old Carta de Nombramiento


TIE
Step 1:
Make a scan of the front and back of your TIE.

Passport
Step 1:
Make a scan of each page of your passport. The most important pages are your biodata page, visa page, and the stamped page from when you first entered Spain with your visa.

Again, this linked guide is specifically for university students. Although their application is very similar to auxes (both use student visas), there are a few differences.
EX-00 Form
Step 1:
When you apply online, complete the EX-00 form on Mercurio. Nothing needs to be printed or scanned. You will select the following:
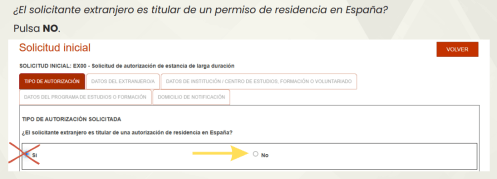
“Autorizacion de estancias PRORROGADA para la realizacion de actividades formativas. (Art. 52.1.e)
Auxiliares de conversacion“
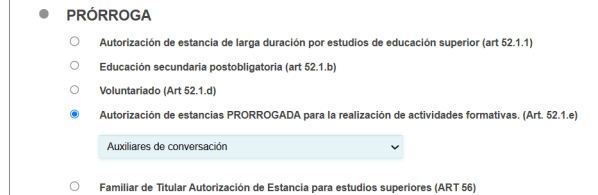
Afterwards, you will include your personal details as well as the details of the school you are assigned for the upcoming school year.
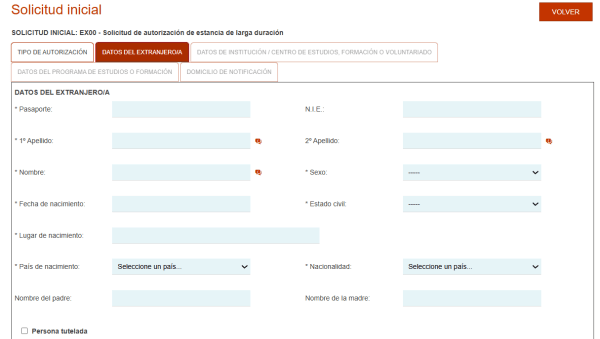

All this information should be available on your Carta de Nombramiento (remember, it’s only a required field if it includes the asterisk). Denominacion refers to your school name. Be careful with the telephone section. If the phone number on the Carta is a landline, it won’t be accepted. Try looking for an alternative on their school website (or by contacting your school).
Tasa 790-052
Step 1:
The Tasa Modelo is a tax form you have to fill out and pay at a bank branch or ATM. This form is used to pay for your prórroga appointment. I highly recommend going inside a bank branch to pay the tax form with exact cash. This way you are guaranteed to get a stamped sheet back proving your payment for the TIE appointment.
If you have a local Spanish bank account, use your bank branch. If you do not have a local Spanish bank account, you can still use a physical bank branch without issue (go before 11 am). I’ve had great luck with Caja Rural in the past. Just go up with your Tasa Modelo filled out, your ID (Passport), and your exact payment. To fill out the form, use the following link.


After selecting the suitable province (where you are sending your application), you will fill out the Tasa form online before printing it out and signing it.


Next, select 1.1.2: Prórroga de la autorización de estancia de larga duración por estudios, movilidad de alumnos, prácticas no laborales o servicios de voluntariado (titular principal y sus familiares)

At the bottom of the page is a captcha and payment method request.



This form will cost about 18 euros. If, however, you have found this webpage useful, please consider rounding up to 20 euros and making a small donation to the webpage. I am only able to maintain this website through the support of my viewers, and with only an average of 1 donor per 10,000 viewers, each contribution is vital. You can be the 1 in 10,000 that makes a difference.
https://residency2spain.com/support-the-page/#Donate
(This is just a link to a page with different donation options.)
After filling out the form, download the form and print it out. Make sure to sign it! Bring the form with exact cash to a bank branch and pay the fee there. Make sure you receive a stamped form in return. This is your proof that you paid the Tasa. Scan a copy of it.
Certificado de Aprovechamiento
Step 1:
This is the approval letter from your school that you can request from your school director at the end of the school year. Feel free to copy the example I have below. Scan a copy.
Aprovechamiento Template
Print the template. Give it to your director. Have them sign it (or better yet, print it on an official school template and sign it). Save it and scan it.

Health Insurance
Step 1:
As mentioned before, you will be uninsured during the Summer from May 31st (or end of June) to October 1st. Having health insurance is a requirement for TIE renewal, but just highlighting the health insurance section of your carta de nombramiento should be enough for most of you.
Unfortunately, for some regions (and depending on your luck), you may be required to purchase Summer health insurance.
You can see examples of this online. They submitted their prórroga, but were declined due to missing “financial means and health insurance”.

This is not a problem I have experienced being an aux in Madrid and Andalucía, but it can happen.
If your application is archived because of missing documentation, you will have time after receiving your letter to rectify the issue and submit the missing documentation.
During my pareja de hecho application, my application was archived because my health insurance plan did not provide enough coverage. I was able to get a new private health insurance plan within a week to submit the necessary documentation.
Because this is a relatively common problem with Valencia, the guide written by Katy Crestol and Becky Kates does a great job of explaining your options for getting Summer health insurance without being locked into a year-long plan. (I highly recommend their other material if you are in Valencia)
Source: 2021-2022 VLC TIE Renewal Guide

You should highlight the health insurance and payment sections of your Carta de Nombramiento copy. Bureaucrats skim and don’t read everything.
Another great option is to get insured through a flexible insurance plan with a generous cancellation policy. You don’t want to be stuck in a year-long plan if you only need insurance during the summer.

You will be insured in October, so if you are able to hold out, that could be a solution as well. Again, being archived for a missing document is not the end of the world. You are given time to provide any missing documentation.

In the end you need to evaluate your own risk tolerance with the pros and cons.
Step 2: Fingerprint Appointment
This would be your Toma de Huellas appointment at an Oficina de Extranjería just like when you received your first TIE. You will bring a few additional documents, and your EX-17 form will be just a touch different, but the process will effectively be identical.
Bring the previous documents from step 1 with you (besides the EX-00 and previous Tasa, of course) alongside the additional requirements listed below.
Get an Appointment
Step 2:
Due to a new pilot program, you may automatically receive an appointment for this step.
Automatic TIE Appointment System
If you don’t automatically receive a new appointment, you will have to manually look for one. It’s the same as your initial TIE application (link)
Prórroga Approval Letter
Step 2:
If you didn’t mark the consent to receive electronic notifications in your application, you should receive an approval letter at your address. Bring your approval letter and a copy.
Waiting for your letter isn’t completely necessary though. You can check your application status online and print the results once you receive “RESUELTO – FAVORABLE”. Bring 2 copies!

Empadronamiento
Step 2:
During your TIE renewal appointment you are more likely to be required to submit an empadronamiento (especially because you may receive your favorable result in the previous region – the updated empadronamiento proves that you should continue the process in your new region). They don’t always ask for it, but it is an official requirement, though, so make sure to bring it just in case. (Make sure you are empadronado in the region where you have the Toma de Huellas appointment)
The empadronamiento is not considered valid if it is over 3 months old. If this is the case, you can always request a new one at an Oficina de Distrito. No formal application required!
Whenever I’ve been asked for my Empadronamiento, I have given the Volante de Empadronamiento every time, and I have never had any issues. You can find out about the Empadronamiento process in the link below.
The Volante de Empadronamiento is the receipt given to you when first applying for Empadronamiento. It will either be a stamped copy of your solicitud or a separate piece of paper printed with your Empadronamiento information. The official certificate takes about a month to process. If you want to be cautious, you can wait until you have the Certificado de Empadronamiento before attending your TIE appointment.
People have been rejected for just submitting their volante, so play it safe if you can.

Foto de Carnet
Step 2:
The Foto de Carnet is a professional 32x26mm photo similar to a passport photo (2″x2″). You only need one picture for your TIE, but I recommend making extras just in case. You can easily get this done at any number of Photo Kiosks. These are found all throughout Spain in subway stations, bus stations, supermarkets, by police stations, and anywhere with decent foot traffic. It’s cheap and easy. Have the pictures taken. Carefully cut out the individual pictures, and bring an envelope with your picture(s) to your future TIE appointment.

EX-17
Step 2:
Complete the form and sign it. Bring the original + a copy of your completed and signed form. The guide is included below.
EX-17 Form – If the link doesn’t work, you can always find the form during the appointment process.
Section 1:

Sexo H – Hombre and M – Mujer.
Estado civil is S for soltero, C for casado, V for viudo, D for divorciado, and Sp for separado.
Address needs to include all of the necessary information (escalera/bloque/whatever).
Section 2:
Leave Blank
Section 3:

I recommend you do not check the box under section 3. This will consent to all vital communications and notifications being sent online instead of by mail. If you do not have a digital certificate or cl@ve, you won’t be able to access these notifications.
Section 4:


(city/town a date de month de year)
Tasa 790-012
Step 2:
The Tasa Modelo is a tax form you have to fill out and pay at a bank branch or ATM. This form is used to pay for your TIE appointment. I highly recommend going inside a bank branch to pay the tax form with exact cash. This way you are guaranteed to get a stamped sheet back proving your payment for the TIE appointment.
If you have a local Spanish bank account, use your bank branch. If you do not have a local Spanish bank account, you can still use a physical bank branch without issue (go before 11 am). I’ve had great luck with Caja Rural in the past. Just go up with your Tasa Modelo filled out, your ID (Passport), and your exact payment. To fill out the form, use the following link.


After filling out the form, download the form and print it out. Make sure to sign it! Bring the form with exact cash to a bank branch and pay the fee there. Make sure you receive a stamped form in return. This is your proof that you paid the Tasa. Bring it to your TIE appointment.
Step 3: Recogida de TIE
Again, just like your first TIE, you will need to make an appointment for about 40 days (or however long the officer told you) after your initial TIE appointment. Make sure it is at the same office as before.
https://icp.administracionelectronica.gob.es/icpco/index

The appointment process is nearly identical to how you made the Toma de Huellas appointment, so follow the same steps and finish making your appointment. Of course, this time you will be requesting “Recogida de TIE” instead of “Toma de Huellas”.
Bring the following documents to your appointment: your passport, the document given to you in the Toma de Huellas TIE appointment, your old TIE, and your appointment confirmation.
Wait in the Recogida de TIE line. offer your papers when it’s your turn. scan your fingerprints, and accept your new TIE!
Congratulations!
If you found the website useful, please Support the Page. Every little bit helps.
Back to Navigation
The information on http://www.residency2spain.com is provided in good faith and is intended for general informational purposes only. Residency2spain makes no guarantees regarding the accuracy, reliability, or completeness of the content. Any decisions you make based on the information found on this site are made at your own discretion and risk. Residency2spain is not liable for any loss or damage resulting from the use of this website.
Copyright © 2022 Residency2Spain All rights reserved.

