
This guide is specifically designed for Profex applicants in the NALCAP program, but the information is useful for applicants of the auxiliary program through many other organizations.
Full Official Guide from NALCAP
This page was last updated on April 1, 2026. Small changes to visa requirements can and do occur, so please double check everything on the official websites below.
Puerto Rico Consulate Official List of Requirements
Puerto Rico Consulate Contact Page
Fighting Bureaucracy – Home
My Journey to Residency
- Important Dates and Deadlines
- Background Check and Apostille + Timeline
- Visa Application Form
- Photograph
- Passport
- Carta de Nombramiento + Insurance
- Medical Certificate
- Proof of Residence in the Consular District
- Visa Application Payment
- Visa Application Process
- Collecting the Visa
In general, Spanish bureaucracy requires extra copies. When in doubt, bring extras.
Before submitting!!! (Check List)
Important Dates and Deadlines:
Program start: November 1st
Visa Processing Time: 3-6 weeks usually
Acceptance letter (Carta de Nombramiento): Around July/August
Suggested visa application dates: Suggested visa application dates: Immediately after receiving acceptance letter and at least two months before the program starts (There are often backlogs at consulates, so the earlier, the better.)

How do I apply for a visa? Consult the consulate’s address and schedule here. For a student visa application, you must first request an appointment by contacting the consulate: Cog.SanJuandePuertoRico@maec.es. For your appointment, arrive on time, organize your documentation carefully, dress business-casual, and be respectful when you are being attended.
Expiration date of documents (the expiration date pertains to the date of your visa application):
Medical form – Doesn’t state (but other Spanish consulates have a limit of 90 days)
Background check – Doesn’t state (but other Spanish consulates have a limit of 6 months)
Suggested start time: After you receive “Plaza Aceptada” status and around June/July. (I highly recommend you start before getting “Plaza Aceptada” this year due to the compressed timeline).
You will NOT be applying for an FBI background check and federal apostille. You will be applying for a Puerto Rican background check and Apostille, so collecting your visa documents will be much quicker (and easier). Regardless, don’t procrastinate! Make sure to apply for your documents in advance.
Once you have collected all the necessary documentation, you can apply for your visa.
Your bottleneck will be the apostilled background check. The background check needs to be recent, so don’t start too early. All of the other documents can be collected in the meantime. I will give an organized timeline for the entire process.
I received my “plaza aceptada” status 3 months after applying for the program, but you can (and should) start your background check soon after applying for NALCAP. (This will prevent you from encountering issues getting your documents on time, but with the risk of wasting your money if you aren’t accepted into the program or receive a very late placement)
Background Check and Apostille Timeline
“Certificado de antecedentes penales: Cuando la duración de la estancia supere los 180 días, los solicitantes mayores de edad penal presentarán original y una copia del certificado de antecedentes penales expedido por el país o países de residencia en los últimos 5 años.”
Residence is defined as having stayed in that country for 6+ months. If you have lived outside the United States for the last five years, you must also submit a criminal record certificate (legalized with the Hague Apostille) and its translation into Spanish by a sworn translator (and a copy of both documents). If you have lived in countries that are not part of the 1961 Hague Convention, the certificate must be legalized by the Ministry of Foreign Affairs of that country and then by the Consulate of Spain in that country.
Getting a Spanish Background Check from Abroad
≈Day 0 Complete the online request using your Puerto Rican driver’s license or DTOP digital ID.
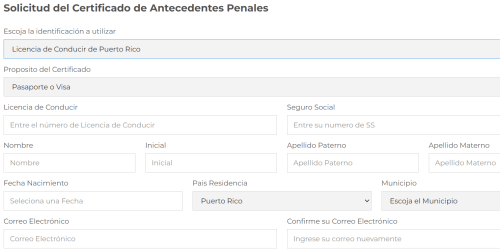
You should receive your results quite quickly. ≈Week 1 Receive your background check and apply for an apostille. This is a way to certify state and federal documents for international use. Your background check is a Puerto Rican document, so make sure to get a Puerto Rican Apostille. Make a high quality printout of the background check PDF and get it apostilled.
You can either go in person by making an appointment at the above webpage. Or, if you are outside of Puerto Rico, you can send an application by mail (again, following the instructions listed in the webpage above).

Your background check will need “…un sello de rentas internas” which costs $3.00. ≈Month 2 receive your apostilled background check. The apostille is the attached document on your background check authenticating its legitimacy. DO NOT REMOVE! Removing the Apostille makes it invalid.
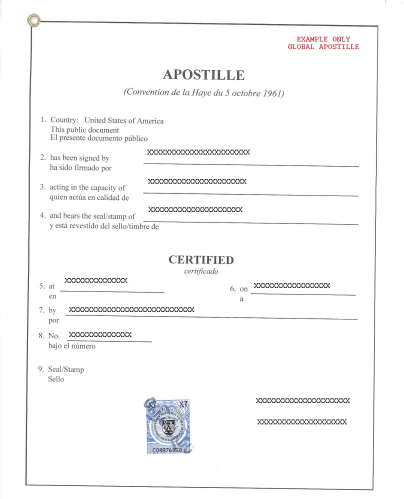
When you scan all your documents for safekeeping (and to make an extra copy), scan each page without removing the apostille attached to the background check (Just fold the ear). Congratulations! You have finished the most lengthy part!
During the wait times throughout this process, you can complete the other requirements. These additional requirements are single step parts and not too involved.

Have you considered supporting this resource? It only costs a few dollars to help immensely. I hope these free guides have helped you better navigate the NALCAP processes and related bureaucracy. Other programs that guide you through the same processes can cost more than $2,000! By contributing pocket change, you can allow this resource to continue to exist.
Visa Application Form
Form link (here) – Bring the original and a copy
“Fill correctly your date of birth (and other dates): DAY/MONTH/YEAR (Spanish way) and do not forget to write your email address and to sign the form.“
Foto/Photo – Attach your recent, professionally done visa photo onto the space provided in the Visa Application Form. “Do not staple or use anything other than glue to attach the photo to the form.”
Sections 1-9 – Fill in your personal information. All questions are given in Spanish and in English
Section 10 – If you’re not a minor, write N/A
Section 11 – N/A (You do not have a Spanish National ID Number)
Section 12 – Type of travel document – Ordinary Passport
Section 13 – Passport number
Section 14 – Date issued
Section 15 – Expiration date (make sure it is valid for the entirety of your stay in Spain.)
Section 16 – “US Department of State”
Section 17-19 – Fill in your personal information.
Section 20 – “Studies”
Section 21 – When you intend to arrive in Spain. (If you put an early date, you may have to purchase supplemental health insurance. If you put a later date, they would likely put a later date on your visa. This doesn’t prevent you from entering Spain earlier as a tourist, but there may be a consequence. The highly unlikely worst case scenario is if you enter Spain before your visa date, they may ask you to leave and reenter Spain after your visa date when applying for a TIE.)
Section 22 – “Multi” or “more than 2”
Section 23 – Address of school or regional education office
Section 24 – If you lived in Spain previously and have a NIE, put it in. If not, leave it N/A. (At your visa appointment, they may want to see the passport that contains the old Spanish visa.)
Section 25 – If you lived in Spain previously and have a NIE, write the date of issuance. If not, leave it N/A.
Section 26-27 – N/A
Section 28 – Information from your Carta de Nombramiento
Section 29 – N/A
DONT FORGET TO COMPLETE SECTION 30 AND 31 – Section 30 – Place (town/city where you signed the document) and Date Section 31 – Signature.
Photograph
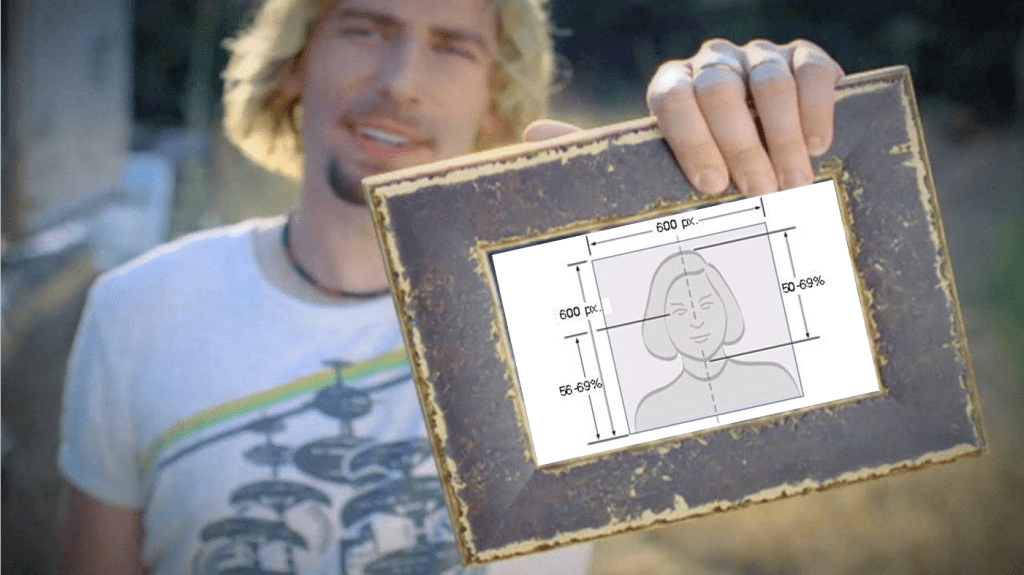
The consulate requests a recently taken passport stye photo (2″x2″).
“Una fotografía reciente, tamaño carné, a color, con fondo claro, tomada de frente, sin gafas oscuras, ni reflejos, ni prendas que oculten el óvalo de la cara.”
I recommend getting extra copies in case the original is damaged.
Many retailers offer official passport photos. I recommend CVS.
Valid, Unexpired Passport
“Valid and current passport with at least 2 blank pages in the visa section and valid for at least the entire duration of the intended stay. Passports issued more than 10 years ago are not accepted.”
You must also include a copy of the page where your data and photos appear.
For 2026-2027, NALCAP requires that your passport is valid until at least November 1st, 2027.
Getting a Passport (U.S.)
Renewing Your Passport (U.S.)
Carta de Nombramiento + Insurance
The Carta de Nombramiento is the school placement letter you receive stating what specific school you are assigned to. You are typically sent an email when you finally receive the Carta de Nombramiento. This file can be accessed through email, Profex, or in your communidad’s web portal: Auxmadrid, Auxand@, and many others. Provide the original and a copy of the document. (You will not receive a “true original” in the mail. Just print 2 copies).
If you haven’t received this letter yet and are curious about the process/wait, check out (Checking on Your Application)
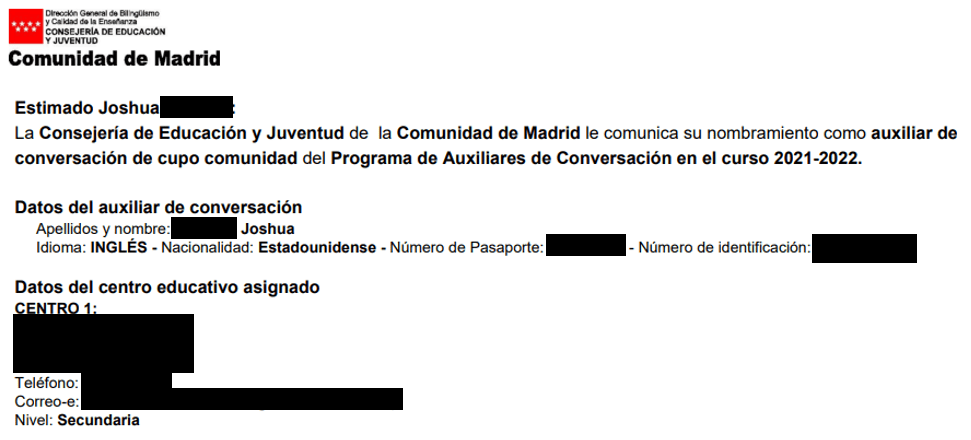
This letter should provide information on the school the applicant has been appointed to (address, phone number, contact email). It should also contain information about the grant, the duration of the program and the insurance policy.
NOTE: The carta de nombramiento covers any financial means. You do NOT need to provide any additional documents for this requirement.
It also covers your health insurance requirement during the program. Unfortunately, a new law (Law RD 1155/2024) which came into affect May 20th, 2025 has confused things.
“Health insurance must be valid from at least one month before the start of studies until 15 days after the end of the studies, or for one year if the duration of the studies is longer than one year.”
**If your carta de nombramiento states that you are covered one month before the start of the program until 15 days after the end of the program, ignore the rest of this section. You are fine.**
In past years, health insurance has not been a requirement for NALCAP participants, and many regions of the NALCAP program continue to insist that it shouldn’t be a requirement.
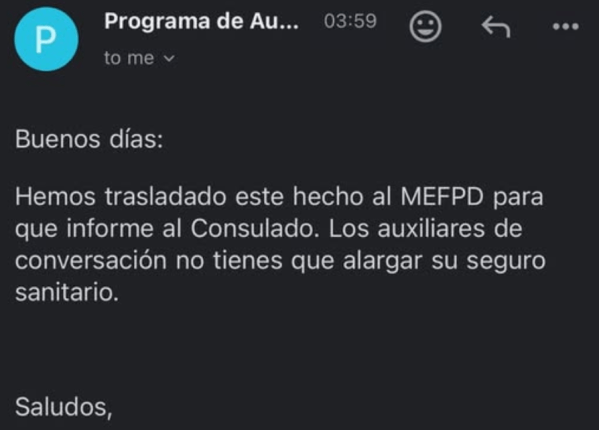
“Good morning: We have forwarded this information to the Ministry of Foreign Affairs and Public Affairs (MEFPD) so they can inform the consulate. Language assistants do not need to extend their health insurance.”
-Response from Andalucia.
This does not change the fact that if you get denied at the consulate, you won’t be able to submit your visa application to begin with. Depending on your consulate, the employee who processes your application, and their mood that day, they can and will deny your application without additional insurance.

You will have 2 options to approach this issue. I will provide all the details I have so you can make an informed choice.
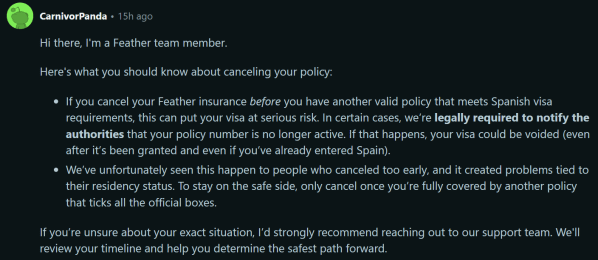
Option 1: Buy supplemental insurance (starting 1 month before the program starts) that lets you cancel when the program’s insurance starts.
Pros: It’ll avoid any potential bureaucratic headaches.
Cons: It can be difficult to find a flexible option that fits the supplemental needs of auxes. I’ve seen success with Swisscare, Sanitas, ASISA, and Feather.
You will be covered by the program’s health insurance during the school year. You just need to get the additional coverage for the visa.
After getting insured, print out your proof of insurance (and a copy) in Spanish and English. Make sure it includes a start and end date of your insurance coverage. Bring these documents to your appointment.
When should I cancel my insurance policy?
Option 2: Duke it out with Spanish officials.
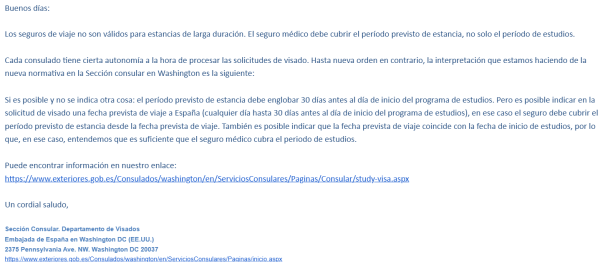
Bring an additional form waiving your rights to an extended visa period (1 month prior to the program start date and 15 days afterwards). Set your visa entry date to November 1st (the start date of the program), and be prepared to argue (respectfully) if they push back.
In an email from the region of Murcia, we were provided a form to hopefully avoid being required to purchase additional insurance. From what I’ve seen, it usually works, but some people get rejected anyway.
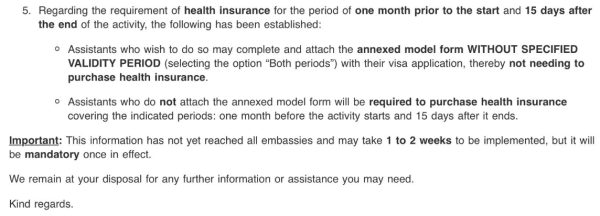
Here is a PDF of the full email from Murcia:
The purpose of the mentioned form (when filled out the way I have it below) is to authorize your visa to only include the exact duration of the “activity” or “study” (Make sure your intended arrival date matches that on your application form!).
The annexed model form example and download can be found below:

Bring your filled out form as well as a copy to your appointment (Spain loves copies).
Medical Certificate
The Medical Form is (typically) only valid for 90 days, so plan accordingly
Medical form template “Original y una copia de un certificado médico que acredite que el solicitante no padece enfermedades que puedan tener repercusiones graves para la salud pública de conformidad con el Reglamento Sanitario Internacional de 2005.”
Book a check-up with your doctor (not nurse, nurse practitioner, or anything other than an MD), and have the template filled out. Please, make sure that all the requirements of the form are completed. If your doctor does not fill out the Spanish section, you need to have the form translated by a certified translator. Follow the instructions carefully.

Instructions on page 2:
Written on letterhead paper from hospital´s/doctor’s office:
See a doctor (MD) and they will determine if you are of good health according to the International Health Regulation (2005). This PDF file can be sent electronically in order to be printed out on letterhead paper. The doctor may also use this sample as a guide to write his or her own certificate. Remember that it must specifically mention the International Health Regulations (2005). The doctor should then print out, sign, date and stamp the Medical Certificate.
Written on Template:
This template can also be signed and filled out by the doctor, with doctor’s stamp; without the stamp, the template is not valid. Therefore, if your doctor does not have a stamp, in order to be accepted, the doctor must write the information from the template to a letter with a letterhead of the hospital or doctor’s office, so it can be accepted at the Consulate.
Proof of Residence in the Consular District
The Spanish consulate in Puerto Rico only services the Islands of Puerto Rico, Vieques, Culebra and the U.S. Virgin Islands, so show proof that you live there.
“Prueba de la residencia en la demarcación consular: se acreditará mediante original y fotocopia de documento que acredite la residencia en la demarcación de esta Oficina Consular.”
“What if I don’t have a Driver’s license?”
Bring official ID that proves your legal residence in the consular district.
Payment of the Visa Fee
“Abono de la tasa de visado” – Spanish consulate of PR. They do not mention payment methods. However, I’ve heard from others that they accept cash. Be prepared with exact cash and/or a debit card.
The American citizen fee is $160.
You are applying for the long term student visa EE.UU (USA).

Visa Application Process
Consult the consulate’s address and schedule here. Then, request an appointment.
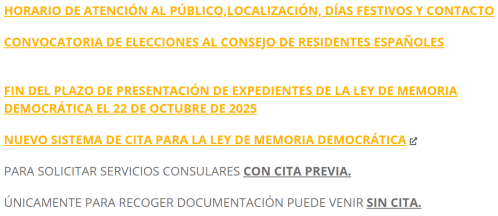
To get an appointment, contact the consulate at the following email address: Cog.SanJuandePuertoRico@maec.es. It’s important you don’t wait until the last moment. Be proactive, and apply early (legally, your appointment must be at least 2 months prior to the start of the program).
For your appointment, arrive on time, organize your documentation carefully, dress business-casual, and be respectful when you are being attended. It’s not a job interview, but your first impression can be impactful, especially if you made a small mistake.
Dirección
Edificio Mercantil Plaza, piso 11, oficina 1101. Av. Ponce de León s/n Hato Rey.- Puerto Rico 00918
At your visa appointment, officials will check and collect all the necessary documents. They will keep your passport while the visa is being processed. This could take between a few weeks and a little over a month. This has 2 major consequences:
- You won’t be able to fly internationally while your visa is being processed.
- You will need to apply for a Real ID before your visa appointment in order to fly domestically. The Real ID requirement for domestic flights began on May 7, 2025.
Collecting the Visa
During the application appointment, the Consular Office will provide the applicant with proof of receipt of the application with a code that enables them to check the status of the dossier through the following link: https://sutramiteconsular.maec.es/Home.aspx
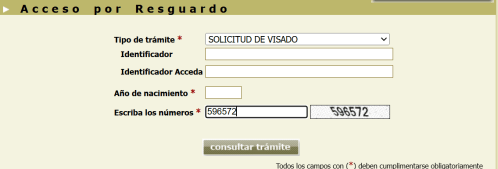
If the status of your visa application is listed as “RESUELTO“, a decision has been made and your visa has either been granted or denied. (you are hoping for a “FAVORABLE” result). You will have to collect your visa in person at the consulate (no appointment needed).
“El visado debe ser retirado personalmente por el interesado o por su representante, si es menor de edad.”
Bring your receipt and ID.
Check List
Before sending your application, go through the entire check list (here)

“I did everything right, and I only suffered a lot. At least I have my visa.”
Jane Doe
If you found the website useful, please Support the Page. Every little bit helps.
Back to Navigation
The information on http://www.residency2spain.com is provided in good faith and is intended for general informational purposes only. Residency2spain makes no guarantees regarding the accuracy, reliability, or completeness of the content. Any decisions you make based on the information found on this site are made at your own discretion and risk. Residency2spain is not liable for any loss or damage resulting from the use of this website.
Copyright © 2022 Residency2Spain All rights reserved.

