
This guide is specifically designed for Profex applicants in the NALCAP program, but the information is useful for applicants of the auxiliary program through many other organizations.
You will be applying for a student visa. The requirements on the Montreal consulate page are correct. It is your responsibility to double check the consulate’s webpage linked below when completing your application.
The consular jurisdiction of the Consulate General of Spain in Montreal includes the provinces of Prince Edward Island, Nova Scotia, New Brunswick, Québec (except Gatineau), and Newfoundland and Labrador.
Full Official Guide from NALCAP
(This is just general info. To get specifics, check the Montreal webpage below)
This page was last updated on March 30, 2026. Small changes to visa requirements can and do occur, so please double check everything on the official websites below.
Montreal Consulate Official List of Requirements
Montreal Consulate Contact Page
Fighting Bureaucracy – Home
My Journey to Residency
- Important Dates and Deadlines
- Criminal Record Check Timeline
Step 1: Fingerprints and Criminal Record Check
Step 2: Getting the Apostille
Step 3: Getting the Translation - Visa Application Form
- Photograph
- Passport
- Carta de Nombramiento + Proof of Financial Means
(6 stamped bank statements from the last six months) - Proof of Accommodation in Spain
(1 week reservation at a hotel/AirBnB – you can cancel it afterwards) - Medical Certificate (Notarized, Apostilled, and Translated)
- Proof of Residence in the Consular District
- Visa Application Payment
- Additional Health Insurance (for early arrivals)*
- Making an Appointment
- Collecting the Visa
**Changes made to the medical certificate requirement – check it out!
In general, Spanish bureaucracy requires extra copies. When in doubt, bring extras.
Before submitting!!! (Check List)
Important Dates and Deadlines:
Program start: November 1st
Visa Processing Time: 3-6 weeks usually
Acceptance letter (Carta de Nombramiento): July/August
Suggested visa application dates: Immediately after receiving acceptance letter and at least two months before the program starts (There are often backlogs at consulates, so the earlier, the better.)

Expiration date of documents (the expiration date pertains to the date of your visa appointment):
Medical certificate – 3 months. Remember that you’ll have to get your medical certificate apostilled, so apply early enough.
Criminal record check – 6 months
Visa photograph – Recent (aim for 6 months or less)
Suggested start time: After you receive “Plaza Aceptada” status and around 4-5 months before the program starts. (Start before your Aceptada status – especially this year)
In past years, the apostille has taken up to 2 months to process. START EARLY!
Once you have collected all the necessary documentation, you can attend an appointment for your visa application.*
*The application method can change throughout a year. Make sure to check the sources.
Your bottleneck will be the background check. The background check is only valid for 6 months, so after you start, the timer starts. If the document expires, you have to apply for a new one. All of the other documents can be collected in the meantime. I will give an organized timeline for the entire process.
I received my “plaza aceptada” status 3 months after applying for the program, but you can (and should) start your background check as soon as you apply for NALCAP. (This will prevent you from encountering issues getting your documents on time, but with the risk of wasting your money if you aren’t accepted into the program or receive a very late placement)
Criminal Record Check Timeline
≈Day 0 Fill out the suitable application form, and go to your local police service or a fingerprinting company accredited by the RCMP to process your application for a certified criminal record check.
≈Week 3-4 Receive your RCMP background check and immediately send it off to receive an Apostille through Global Affairs Canada.
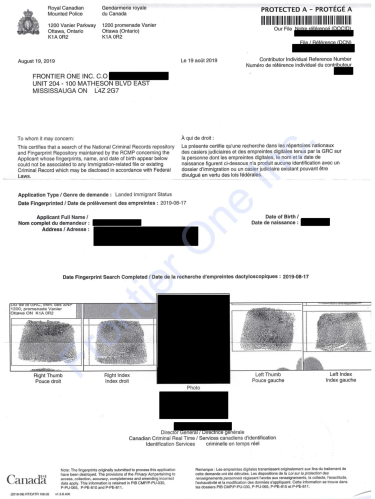
The Apostille is a form of authentication for the international use of public documents. After succesfully applying, it will be attached to your criminal background check to authenticate your document. DO NOT REMOVE IT! Doing so invalidates the document.
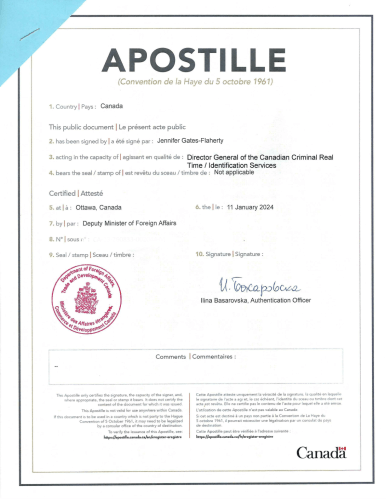
Here is an example of the affixed Apostille. ≈Month 2-3 Receive the apostille in the mail. When you scan all your documents for safekeeping, scan each page without removing the apostille attached to the background check (Just fold the ear). Send the document to be translated into Spanish by a sworn translator. I recommend only getting a translation after receiving “Aceptada” status if you are concerned about not being accepted into the program.
≈Month 2-3 Receive the sworn translation. Congratulations! You have finished the most lengthy part!
Fingerprints and Criminal Record Check
Here is the official language from the consulate:
“This requirement is not mandatory if the duration of the requested stay is less than six months. However, if the length of stay requested is longer than six months, a criminal record certificate, together with an official translation into Spanish, is required. It must be issued by the authorities of the country or countries in which you have resided for the last 5 years. This certificate cannot be older than 6 months, unless the certificate itself specifies a longer expiration. In the case of Canada, only the criminal record certificate issued by the RCMP containing the visa applicant’s fingerprints will be accepted. You will find more information about how to obtain it here.
Criminal records certificates from local police stations will not be accepted. The Canadian Criminal Record Certificate must be with the Hague Apostille Certification issued by Global Affairs Canada, and translated into Spanish. If the criminal record certificate has been issued outside of Canada, it must be legalized by the Spanish Consular Office with jurisdiction in that country, unless the country that issued it has signed the Hague Convention, in which case it must be apostilled. You can check the list of the countries signing the Hague Convention here.”
In total, you need an RCMP background check, an Apostille by Global Affairs Canada, a Sworn translation of the background check and Apostille, and an additional photocopy of those documents.
Getting a Spanish Background Check from Abroad
Step 1: Fingerprinting
Fill out the Application Form: There are many types of background checks offered by the RCMP. You are going to fill out the form designated for immigration and travel.
https://rcmp.ca/sites/default/files/doc/6674e.pdf
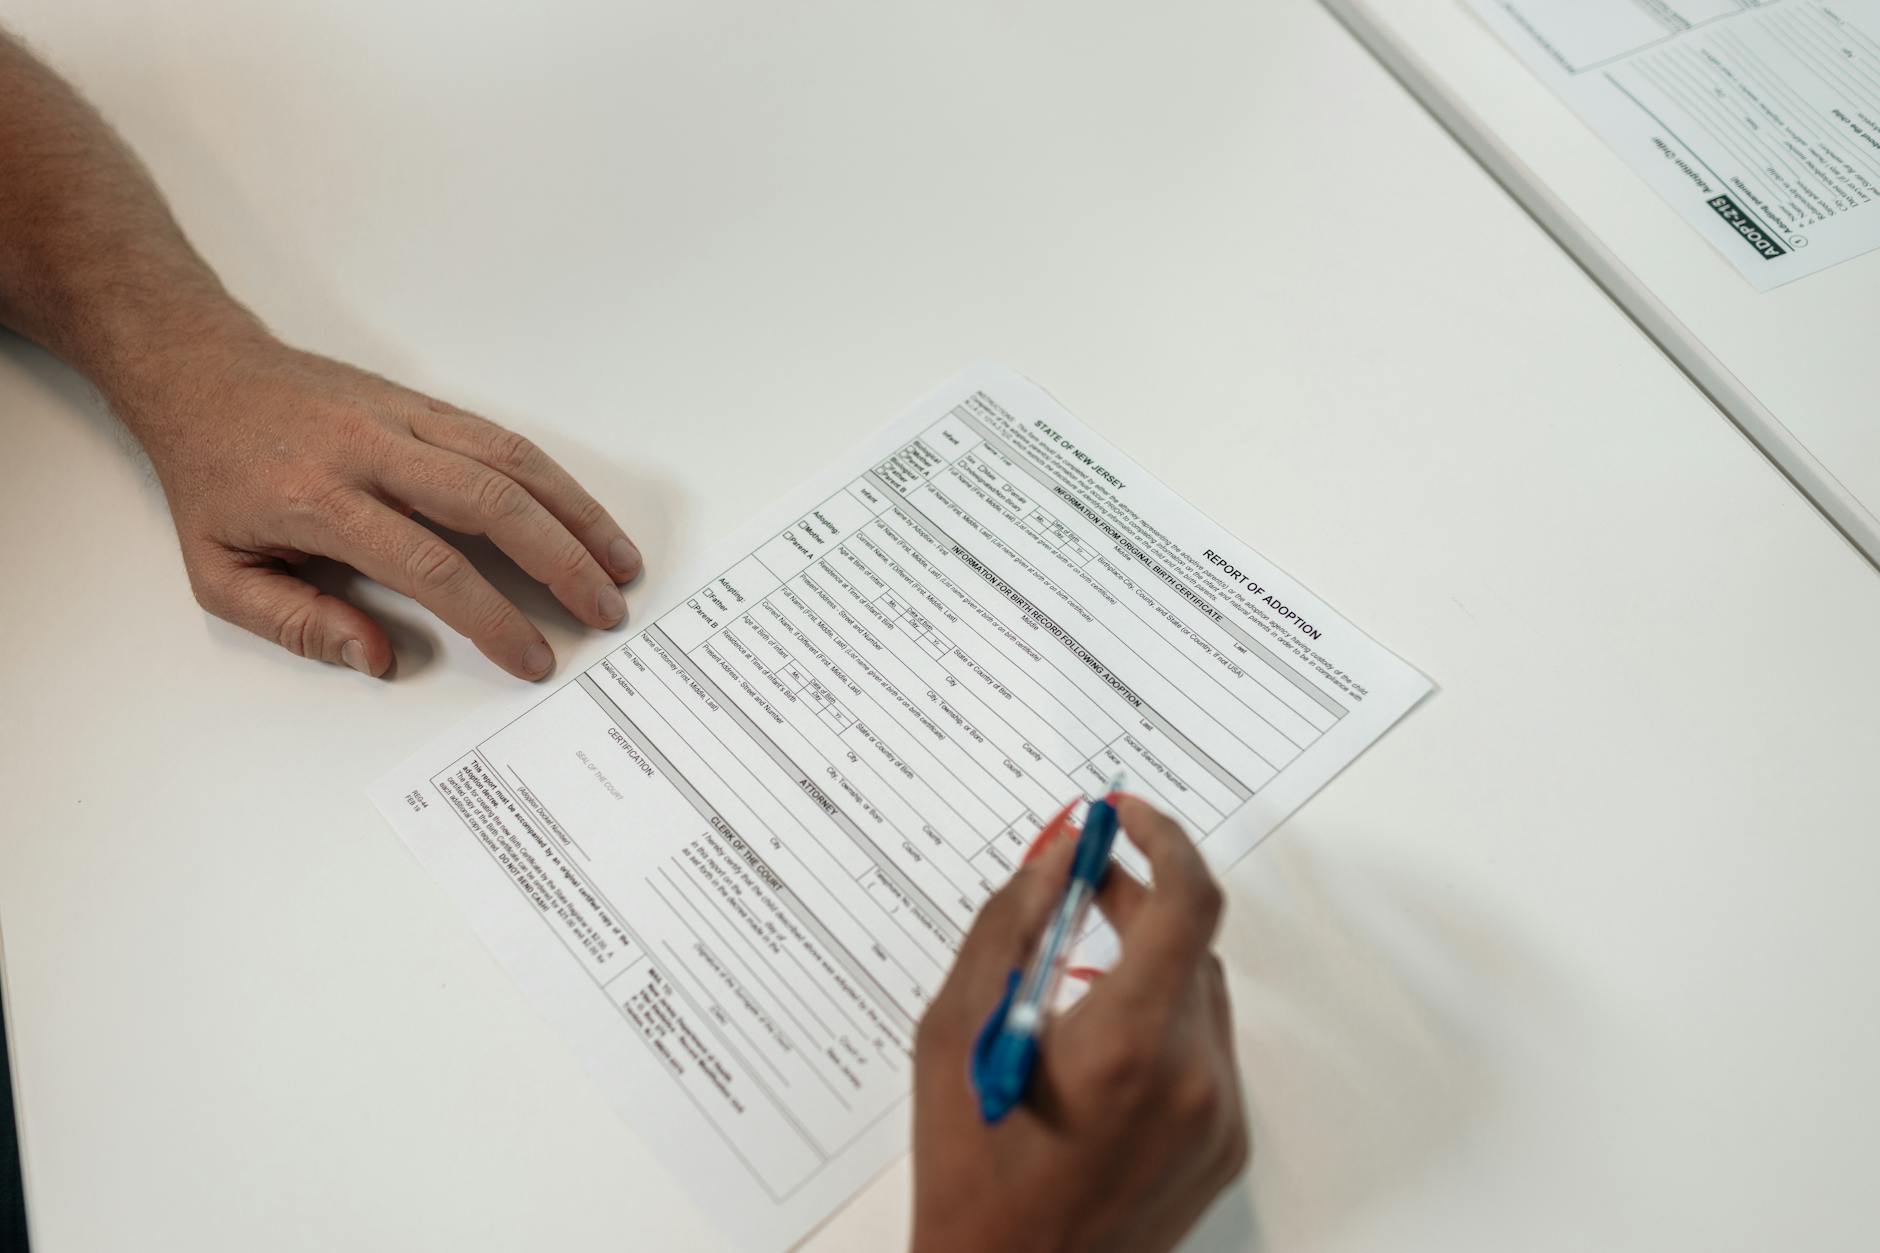
In this form, you will provide your name, date of birth, and consent (check the boxes in the list). At the bottom, you will sign the form. It’s very straightforward. When finished, print a copy to bring to your appointment.
Where to go: You can have the fingerprinting service done at your local police service or a fingerprinting company accredited by the RCMP to process your application for a certified criminal record check.
Make sure you follow the instructions provided by the fingerprinting service provider you choose, but generally, at your appointment, bring your application form, 2 forms of valid ID (original and copy), means of payment, and the instructions from the consulate requesting the RCMP background check.

The RCMP processing fee is twenty-five dollars. You will have to pay a separate fee for the fingerprinting service. You should receive your results relatively quickly (within about two/three weeks or so). Once you get the results, you can apply for the Apostille.
Haven’t got the results from the RCMP?
Please contact the RCMP after 3 weeks for your application status
- Email:ccrtis-scictr@rcmp-grc.gc.ca
- Phone:(613) 998-6362
- Please provide:
+ Your full name & date of birth
+ The date your application was submitted
+ The reason for your criminal record check
+ A phone number where you can be reached
+ Your Document Control Number (DCN)
***The DCN can be found on the confirmation report that was provided to you on the date of fingerprinting.
Step 2: Getting the Apostille
As soon as you get the criminal background check results, you can apply for Apostille of the Hague by Global Affairs Canada. The Apostille is a form of authentication for the international use of public documents. After succesfully applying, it will be attached to your criminal background check to authenticate your document. DO NOT REMOVE IT! Doing so invalidates the document.
Before starting, make sure your criminal background check contains the following:
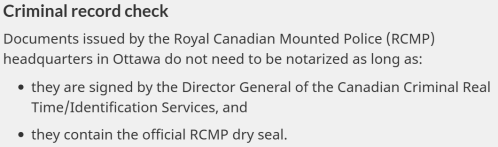
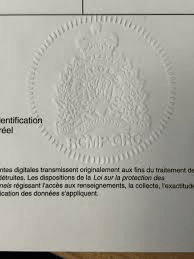
Here is an example of the RCMP dry seal.
In the link below, you can find detailed instructions for applying for the Apostille and information for edge cases such as if you are applying from outside of Canada. The list underneath is just a summary of what you need for normal mail-in applications.
Apostille Application Requirements: (link)
- A completed Authentication Form (you may have to download the PDF to your Desktop to properly access the form).
Section 1: Personal Information
Section 2: Shipping Details – you must include a self-addressed stamped envelope or a prepaid courier shipping label for the return of your documents. In this section you provide those details.
Section 3: No
Section 4: RCMP Criminal Check, 1, Your Province, Spain.
After completing the form, print it, sign it, and date it. - Your RCMP Criminal Background Check
- A self-addressed stamped envelope or a prepaid courier shipping label for the return of your documents.
Courier waybills that include account numbers are not accepted and will be returned by regular mail. Only prepaid shipping labels are accepted.
You will also need an envelope to send your application and accompanying documents to Global Affairs Canada. I highly recommend getting postage with a tracking number.
Global Affairs Canada
Authentication Services Section
2421 Lancaster Road
Ottawa, ON K1B 4L5
Canada
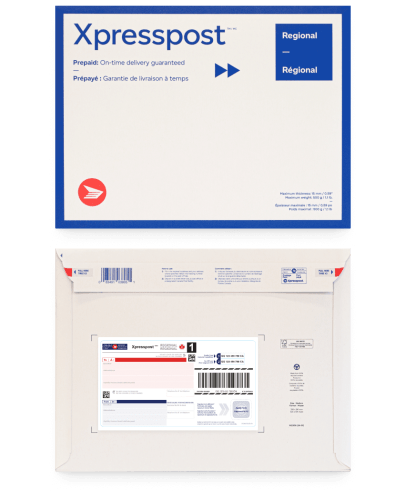
When you finish preparing the required documents, place your RCMP criminal background check, Authentication Form, and self-addressed envelope (you can fold it so it fits) in your tracked envelope addressed to Global Affairs Canada.
After sending in the application, you will have to remain patient. It’s a long wait.
Due to the high volume of authentication requests received, the Global Affairs office is unable to confirm receipt of your request or provide a status update of your request before the minimum wait time has lapsed.
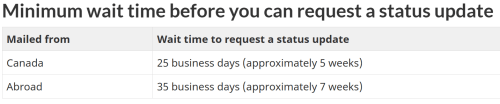
Therefore, if you wish to obtain confirmation of delivery, it is strongly encouraged you send your application using registered mail or courier, which will allow you to track the delivery status. If the tracking information indicates that your mail was delivered, then you may assume that it has been received by their office and is awaiting processing.
Getting the Translation
After receiving your Apostilled background check (and after getting “aceptada” status if you are concerned about not being accepted into the program) Send the apostilled background check to be translated. You can do this by simply sending a PDF of your apostilled background check to a sworn translator.
The Montreal consulate requires a translation into Spanish by a sworn translator. A sworn translation is different from a standard translation, so USE A SWORN TRANSLATOR.
Make a scan of each page without removing the apostille attached to the background check (Just fold the ear). Send the document to be translated into Spanish by a sworn translator.
What makes a sworn translator “official”?
A sworn translator is a translator who has been licensed by the Ministry of Foreign Affairs. Not all translators are sworn translators. A sworn translation is required for legal purposes such as getting a visa. Here is an example of a sworn translation below:
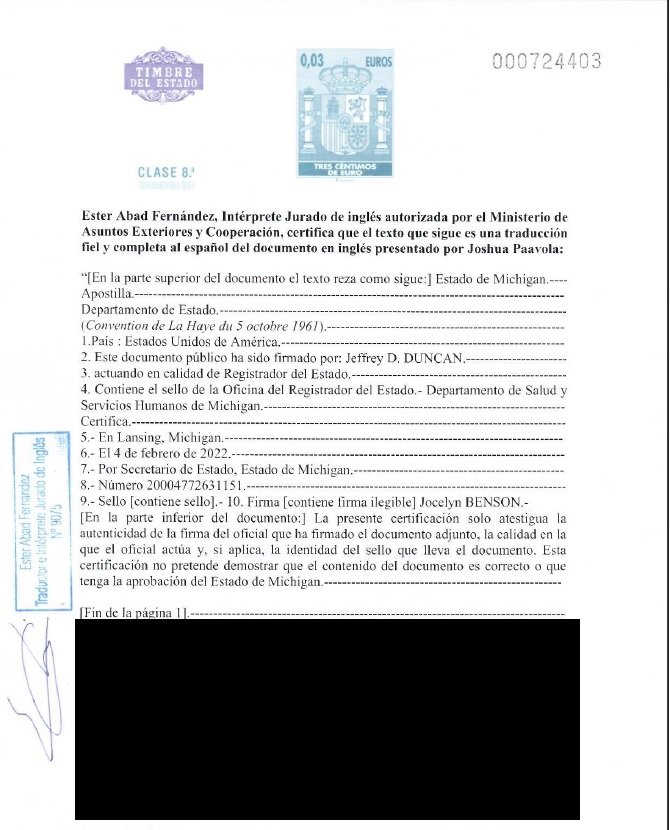
How to get the sworn translation: Get into contact with a sworn translator. Give the relevant information such as the type of documents being translated, preferred payment method*, translation delivery method (attached in an email), and the expected turn-around-time.
*You’ll have to make a money transfer to pay for the translation. Some translators have domestic accounts, but regardless, you will need a designated transfer service eventually when moving to Spain. Be mindful of the fees and exchange rates.
Although many familiar services like PayPal can make domestic and international transfers, your goal is to pay the least amount of dollars possible, not more. Those services tend to have terrible exchange rates, which work like massive hidden fees on each transaction. That’s why I highly recommend Wise. It is what most auxiliaries use because it has lower fees, higher transparency on costs, and reliable, fast transfers. Feel free to investigate for yourself. You can find a guide below.
Wise
(Wise can help you make domestic and international bank transfers for cheap.)

For the 99% of you who are getting English to Spanish translations, I highly recommend working with Alba:
alba.fernandez.c.residency2sp@gmail.com
She is a sworn translator who has experience working with auxiliaries and helping individuals get through difficult bureaucratic processes in Spain which means she will be highly responsive and helpful while also providing budget-friendly pricing. When I got my translations done through Alba, I used Wise to make a bank transfer directly to her American account.
What if I need a translation from a non-English language to Spanish?
You can search for sworn translators that work for other language pairs in the webpage below. It’s the same process, but you may have more difficulties finding responsive translators. Not everyone is actively looking for work.
Visa Application Form
Form link (here) – Bring the original and a copy
*Very important: Please keep in mind that the date format in Europe is:
Day/Month/Year DD/MM/YYYY
Foto/Photo – Cut out your recent, professionally done visa photo and glue it onto the space provided in the Visa Application Form.
Sections 1-9 – Fill in your personal information. All questions are given in Spanish and in English
Section 10 – If you’re not a minor, write N/A
Section 11 – N/A (You do not have a Spanish National ID Number)
Section 12 – Type of travel document – Ordinary Passport
Section 13 – Passport number
Section 14 – Date issued
Section 15 – Expiration date (make sure it is valid for the entirety of your stay in Spain.)
Section 16 – Issued by Immigration, Refugees and
Citizenship Canada (IRCC)
Section 17-19 – Fill in your personal information.
Section 20 – “Studies”
Section 21 – When you intend to arrive in Spain. (Early arrivals may have to purchase supplemental health insurance. More information available in the insurance section).
Section 22 – “Multi” or “more than 2”
Section 23 – Address of school or regional education office
Section 24 – If you lived in Spain previously and have a NIE, put it in. If not, leave it N/A. (At your visa appointment, they may want to see the passport that contains the old Spanish visa.)
Section 25 – If you lived in Spain previously and have a NIE, write the date of issuance. If not, leave it N/A.
Section 26-27 – N/A
Section 28 – Information from your Carta de Nombramiento
Section 29 – N/A
DONT FORGET TO COMPLETE SECTION 30 AND 31 – Section 30 – Place (town/city where you signed the document) and Date Section 31 – Signature.
Photograph
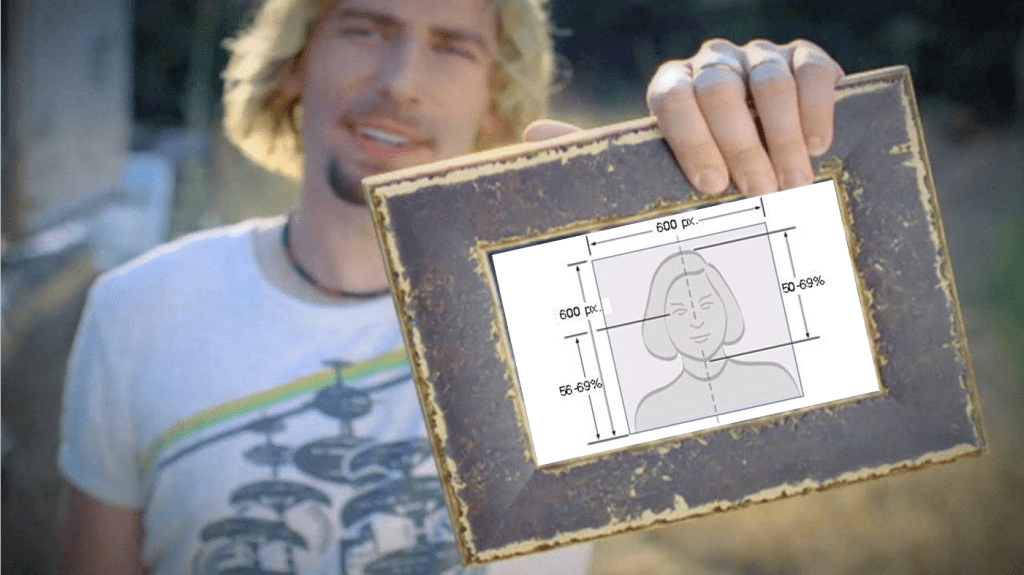
You need “a recent, passport-size, colour photograph, taken against a light background, facing forward, without dark or reflective glasses, or any garments concealing the oval of the face.”
I recommend paying for extra copies in case the original is damaged.
You can get this done at various pharmacies, retail stores, and select shipping centers: CVS, Wal-Mart, and FedEx (among many others). Don’t try to do it yourself. Just pay for the service because there are many requirements.
A simple mistake that really made my visa appointment stressful: I got my picture done at a supermarket. In my picture a few stray hairs went out of frame in the picture. This made the passport photo invalid, so I had to quickly get another one taken at the CVS across the street from the consulate during my visa appointment.
Passport
“Original and a photocopy of the page or pages of the passport that contain biometric data. The passport must be valid for at least one year and contain two consecutive blank pages. Passports issued more than 10 years ago will not be accepted.”
For 2026-2027, NALCAP requires that your passport is valid until at least November 1st, 2027.
If you are a non Canadian passport holder, you need to provide your passport and a permanent resident card, work permit, or study permit with certification of studies.
Carta de Nombramiento + Proof of Financial Means
The Carta de Nombramiento is the school placement letter you receive stating what specific school you are assigned to. You are typically sent an email when you finally receive the Carta de Nombramiento. This file can be accessed through email, Profex, or in your communidad’s web portal: Auxmadrid, Auxand@, and many others. Provide the original and a copy of the document. (You will not receive a “true original” in the mail. Just print 2 copies).
If you haven’t received this letter yet and are curious about the process/wait, check out (Checking on Your Application)
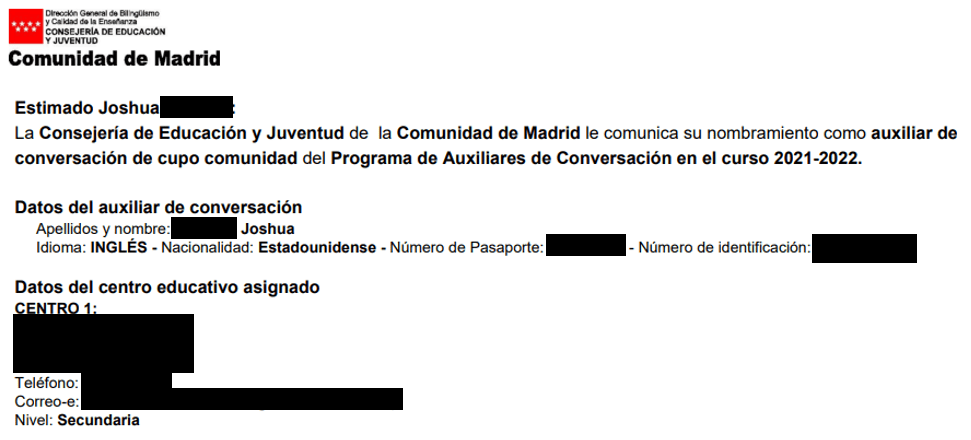
This letter should provide information on the school the applicant has been appointed to (address, phone number, contact email). It should also contain information about the grant, the duration of the program and the insurance policy.
The Carta de Nombramiento will also mostly cover your proof of financial means as it indicates you will have income while living in Spain. However, you are expected to supplement it with your own savings to prove that you won’t be homeless for the first month in Spain (a few thousand should do it).
You need to provide 6 stamped bank statements from the past 6 months. I also recommend providing a stamped bank account summary to prove that the account is in your name. Do not staple these documents together. Just provide them alongside your application.

Proof of Accommodation in Spain
You will need about a week of accommodation starting the date you plan on entering Spain. Although not mentioned in the consulate page, they want to confirm that you won’t be homeless your first few nights when arriving. Book a hotel, hostel, or AirBnB that provides proof of your reservation and print 2 copies for your appointment.
After your visa appointment, you can either keep or cancel your reservation (you’re going to need temporary accommodation anyway when first arriving in Spain).
Medical Certificate
The Medical Form is only valid for 90 days, so plan accordingly
I’ve just seen information online that Montreal is requesting an Apostilled and translated medical certificate (August 19, 2026). This is an entirely new requirement for 2026.
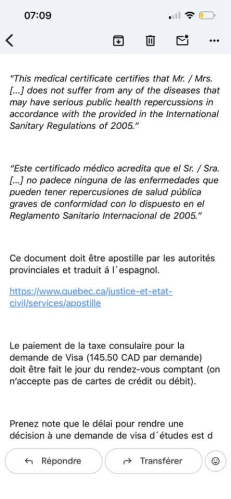
“Yes, apostilled and both the certificate and apostille have to be translated. If you get a bilingual certificate, only the apostille has to be translated.”
“…Applicants must submit original and a copy of a medical certificate accrediting that they do not suffer from any disease that could cause serious repercussions for public health pursuant to the 2005 International Health Regulations. Foreign documents must be legalized or apostilled and, where applicable, must be submitted together with an official translation into Spanish.
This certificate must be issued by a registered medical practitioner no later than 3 months prior to the date of application, it must be formulated in the following terms or similarly: ‘This medical certificate certifies that Mr. / Mrs. […] does not suffer from any of the diseases that may have serious public health repercussions in accordance with what is stipulated in the International Sanitary Regulations of 2005.’”
Book a check-up with your doctor (not nurse, nurse practitioner, or anything other than an MD), and have the template provided above filled out. Please, make sure that all the requirements of the form are completed. There are instructions on the back.
Some doctors are hesitant to sign the medical form document because they are concerned about the language used in the form. You can remind them that they are not confirming you are of perfect health. They are confirming that you aren’t a threat to public health (as in you aren’t carrying the plague for example).

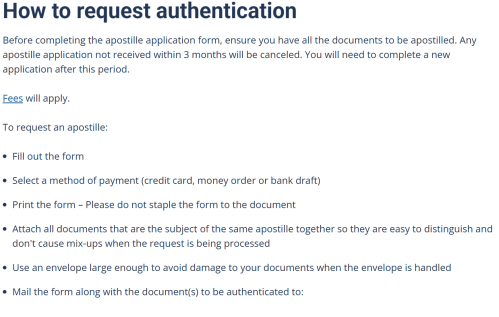
After getting the form filled out, make sure to get it Apostilled and translated. In the email above, Montreal specifically states that the document must be apostilled by the provincial authorities and translated into Spanish.
Each province should have its own process for applying for an Apostille. Here is an example for Quebec:

Bring an original and copy of both the apostilled medical form and translation to the visa appointment.
Proof of Residence in the Consular District
The Montreal consulate only services the provinces of Prince Edward Island, Nova Scotia, New Brunswick, Québec (except Gatineau), and Newfoundland and Labrador, so show proof that you live there.
“Provincial health card, driver’s license, etc., original and copy. If you do not hold a Canadian passport, you must submit a document proving your status in Canada (permanent resident card, work permit, or study permit with certification of studies).”
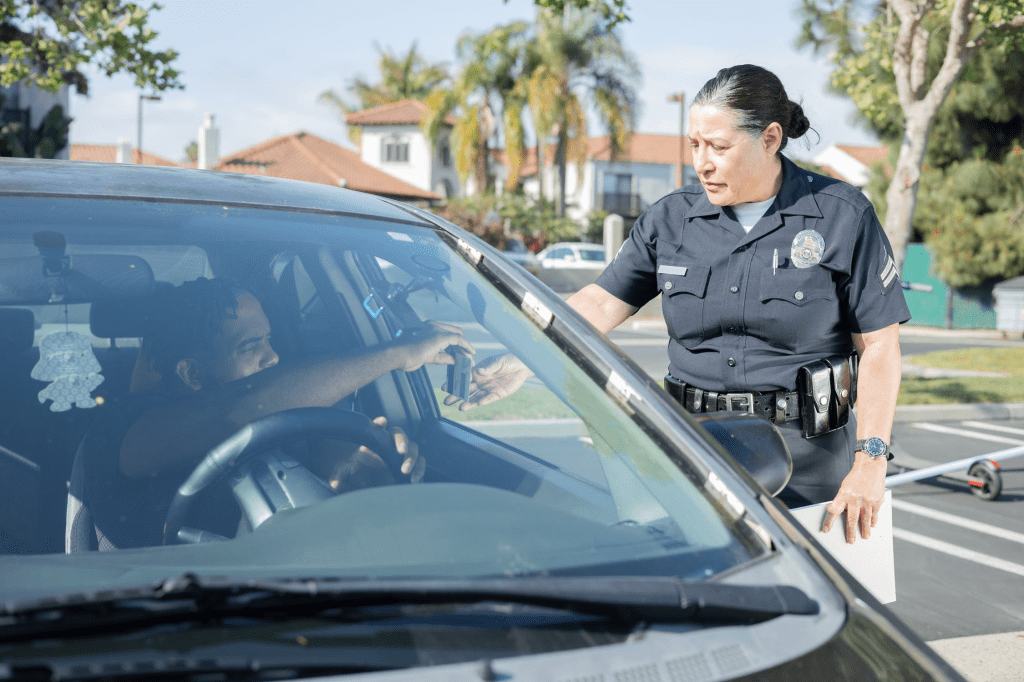
“What if I don’t have a Driver’s license?”
Bring official ID that proves your legal residence in the consular district.
Visa Application Payment
Montreal states the following:
“The consular fee is to be paid the day of your appointment, preferrably in cash or by money order or certified cheque to “The Consulate General of Spain in Montreal”. You can check the fees in Tasas Montreal. “ (bring exact cash if you plan on paying with cash)
To save you the trouble, the cost of a NALCAP visa is
CAN $145.50

Additional Health Insurance (for early arrivals)*
You will be covered by the program’s health insurance during the school year. If your carta de nombramiento states that you are covered one month before the start of the program until 15 days after the end of the program, ignore the rest of this section. You are fine.
However, you may need to get additional coverage for the visa if your planned entry date in Spain is prior to the start of the program. This expectation has been inconsistently applied in the past. Some applicants are rejected without supplemental insurance, and others aren’t. It’s an unfortunate part of Spanish bureaucracy.
Additionally, you can always put a later entry date in your application and enter Spain before the stated date as a tourist. However, there is a potential consequence that is highly unlikely. When applying for a TIE, you may be asked to leave and reenter Spain after your visa’s start date.
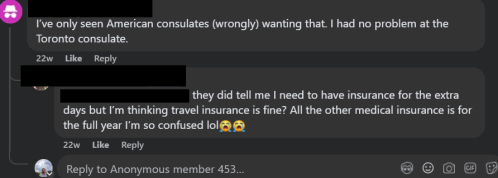
One thing is consistent: Travel insurance doesn’t count.
That creates a unique problem: You only need a month or so of coverage, and you need actual health insurance that covers all the visa requirements (which would typically have a year’s worth of coverage).
How to play it safe: buy supplemental insurance (starting 1 month before the program starts) that lets you cancel when the program’s insurance starts.
Pros: It’ll avoid any potential bureaucratic headaches.
Cons: It can be difficult to find a flexible option that fits the supplemental needs of auxes. I’ve seen success with Swisscare, Sanitas, ASISA, and Feather.
You will be covered by the program’s health insurance during the school year. You just need to get the additional coverage for the visa.
After getting insured, print out your proof of insurance (and a copy) in Spanish and English. Make sure it includes a start and end date of your insurance coverage. Bring these documents to your appointment.
When should I cancel my insurance policy?
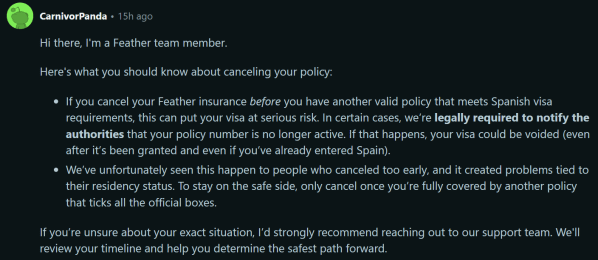
Again, most of you will likely be fine without the supplemental insurance for your visa appointment, but others may want to play it safe (also, it’s still coverage in case an emergency happens after arriving in Spain). It’s a personal choice.
Making an Appointment
“The Application must be submitted in person with a previous appointment to be scheduled by writing an email to cog.montreal.vis@maec.es . In your email you must identify yourself with your full name, indicate the date of travel, and attach a scanned copy of your passport, of a document proving your residence in this consular demarcation and of your admission at the centre of studies (Your Carta de Nombramiento).”
Don’t be picky about your date! It can often be very difficult to find an available appointment.
Make sure to plan ahead (Where will you park? How will you get there? How early do you need to leave?). Do NOT arrive late to your appointment.
Address:
1200 Avenue McGill College, Suite 2025
H3B 4G7 Montréal (Québec)
Take your appointment reservation to the visa application. Bring everything in the check list/all the necessary documents to this appointment (don’t forget the extra copies!) It’s also a good idea to wear something business casual. It’s not a job interview, but your first impression can be impactful, especially if you have made a small mistake.

At your visa appointment, officials will check and collect all the necessary documents. They will keep your passport while the visa is being processed. This could take between a few weeks and a little over a month, so you won’t be able to fly internationally while your visa is being processed.
Make sure to also inquire about the visa collection procedure. Some consulates have a specific time period dedicated for collecting visas.
Collecting the Visa
During the application appointment, the Consular Office will provide the applicant with proof of receipt of the application with a code that enables them to check the status of the dossier through the following link: https://sutramiteconsular.maec.es/Home.aspx
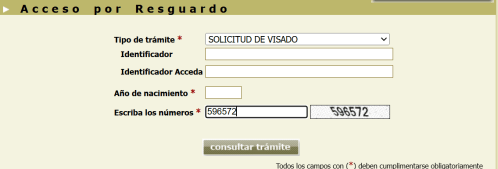
If the status of your visa application is listed as “RESUELTO“, a decision has been made and your visa has either been granted or denied. (you are hoping for a “FAVORABLE” result). You will have 2 months from that date to collect your visa in person at the consulate (no appointment needed).
“The visa must be collected in person by the applicant or by their representative (if the applicant is a minor) within a maximum period of 2 months, counted as of the day after the date on which the favourable decision is notified.”
Bring your receipt and ID.
Check List
Before sending your application, go through the entire check list (here)

“I did everything right, and I only suffered a lot. At least I have my visa.”
Jane Doe
If you found the website useful, please Support the Page. Every little bit helps.
Back to Navigation
The information on http://www.residency2spain.com is provided in good faith and is intended for general informational purposes only. Residency2spain makes no guarantees regarding the accuracy, reliability, or completeness of the content. Any decisions you make based on the information found on this site are made at your own discretion and risk. Residency2spain is not liable for any loss or damage resulting from the use of this website.
Copyright © 2022 Residency2Spain All rights reserved.

