

If you are a dual citizen with European citizenship, your life will be much easier than those who need to apply for a visa. There are still a handful of simple requirements you need to manage, however.
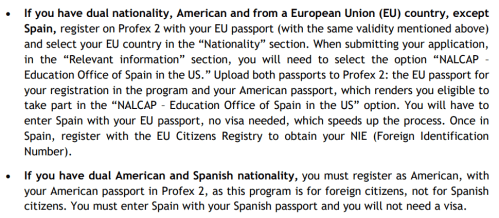
In summary, you need to get a background check and medical certificate done before heading to Spain. I will include info on that below. Additionally, you will need to register in the “Registro de Ciudadanos de la UE” once you arrive in Spain to get your NIE (again, this is all covered below). No BLS visa appointments, and no drama.
I am only going to cover the requirements before leaving for Spain and how to register in the “Registro de Ciudadanos de la UE”. For more in-depth information on the specific requirements for EU citizens, see below:
EU Dual Citizens – Auxiliar de Conversacion Guide
Google Doc – Guide for EU citizens
Of course, if you have citizenship in Spain, you won’t need to register as a citizen of the EU or receive a foreign identification number either (since you’re not really a foreigner in Spain as a Spanish citizen).
The handbook also gives information on the TIE requirement. If you want a simple to follow step by step guide, please direct yourself to the following page:
Your First TIE
Don’t overwhelm yourself. This is a later requirement for foreigners after arriving in Spain.

Pre-Departure
I recommend applying for the following documents at least a few months before your flight to Spain. Give yourself plenty of time for any unexpected issues.
Required Documents Before Going to Spain
(It’s a good idea to have an extra copy of each)
Certificado de Registro de Ciudadano de la Unión Europea
“All EU citizens who plan on residing in Spain for at least 3 months must apply for a registration certificate within those 3 months.” Doing so will provide you with a foreign identification number (NIE). This number will be required when applying for a foreign identification card (TIE).
Even though you legally have 3 months to get registered, you should get it done immediately because although not strictly enforced, foreigners are expected to apply for a TIE appointment within 30 days of arriving in Spain. Additionally, you will need your NIE for simple things like opening a bank account.
Certificado de Registro de Ciudadano de la Unión Europea
Requirement Documents (After Arriving in Spain)
- Completed EX-18 Form + Copy
- Tasa 790-012
- Valid, Unexpired EU Passport or National ID (Proof of EU Citizenship) + Copy
- Empadronamiento/Proof of Address
- Carta de Nombramiento + Copy
- Appointment
FBI Background Check
Overview of the FBI Background Check Process
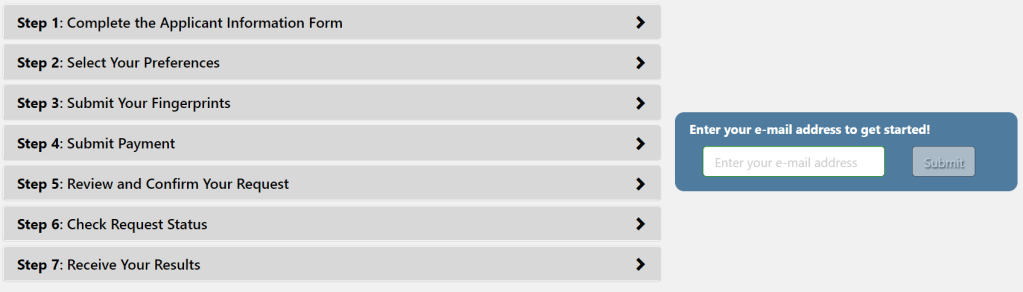
≈April 16 Request an FBI background check by submitting an online application along with your fingerprints (digital or physical). Follow the steps provided by the FBI for an online background check request.

Applying online is the fastest and most effective way to receive your FBI background check. Read steps 1 through 7 and then enter your e-mail address in the box to the right. (this process can also be done while in Spain)
After you click submit, you should receive an automated email with a PIN and a link to your request.
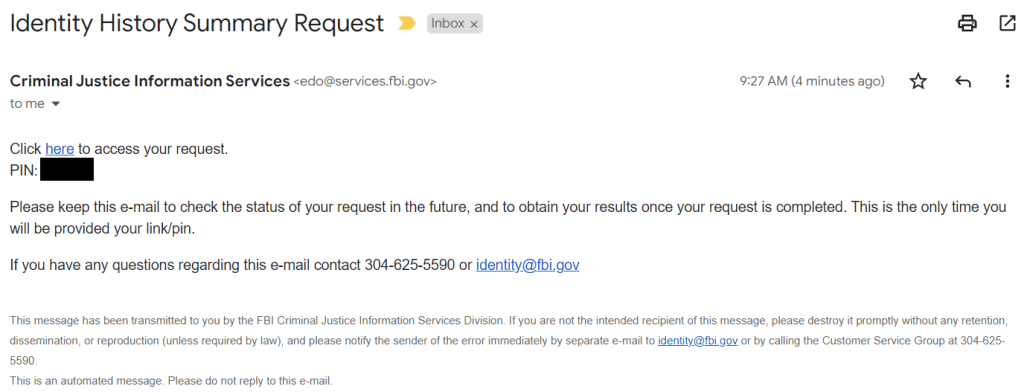
Click on the link and enter your PIN to continue. There you will have to agree to a privacy statement before you continue. The webpage has 5 steps to follow. I’ll walk you through them, but they are very simple. (The webpage may give you errors if you do this on mobile. When I accessed it using Google Chrome on my mobile device, it didn’t provide me all the options available.)
Step 1 – Personal Information: Enter your personal information.
Step 2 – Mailing Address: Enter your mailing address and phone number.
Step 3 – Preferences: Q1 – Yes, Q2 – Yes, Q3 – Yes, via e-mail (enter e-mail address)
Step 4 – Fingerprint Card:
Have this done electronically. It avoids the needless delay of sending an application by mail (sometimes the delays are up to 3 weeks).
Fingerprinting Locations for those of you Currently Residing in Spain (you can also always fill out a fingerprint card and mail it in)
If for whatever reason, you can not get this done electronically, click on the mail option and follow the steps there. You will need to fill out a fingerprint card and send it by mail. To get a fingerprint card properly filled out, print out the fingerprinting template and bring it to your local police station. There, you can pay a small fee and request to have fingerprinting done for an FBI background check.

After selecting Electronic submissions, a box will pop up giving Third-Party Fingerprinting Locations near you. There is also an option to expand your search radius if the options provided are not convenient for you.
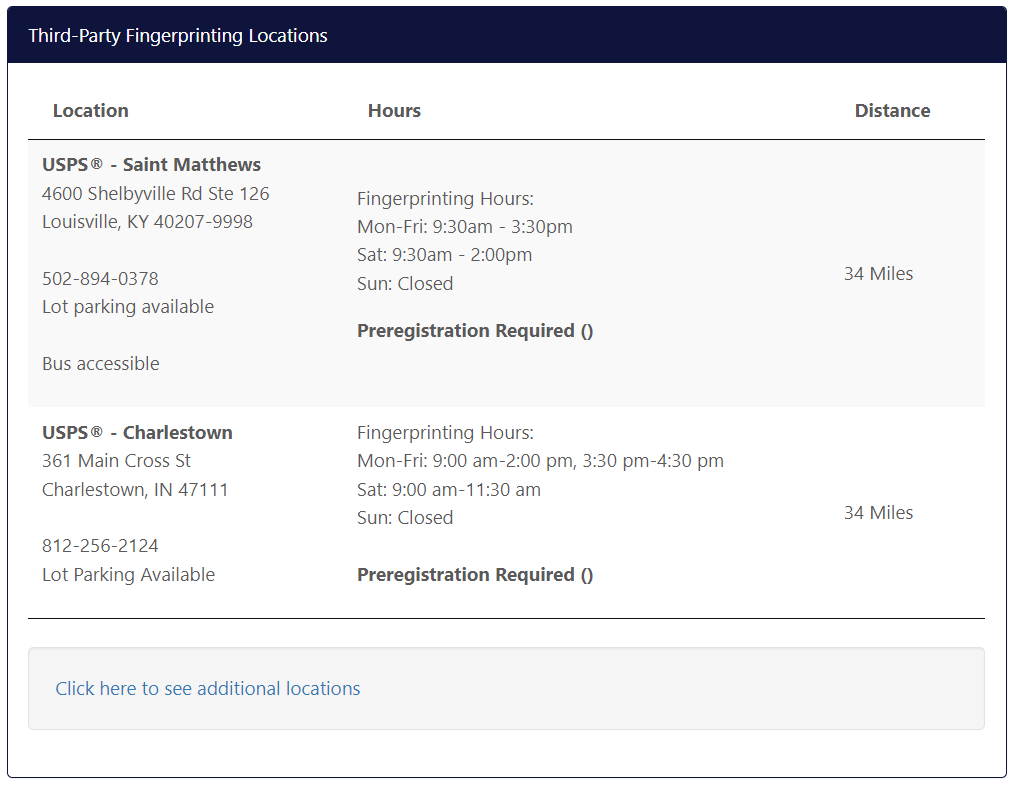
In my situation, I would check all the options in the List of Participating U.S. Post Office Locations without providing my zip code.

If you choose to use one of the location options offered by the FBI, keep the electronic submission option checked and continue to step 5.
Step 5 – Payment: Confirm your information and continue with payment. The cost will be $18. Complete your payment details. Don’t forget! You will pay an additional $50 as a fingerprinting fee at a participating USPS location. Check for an email confirmation, and save the order number. This will be used to register for the fingerprinting services.
Finally – have your fingerprints taken: bringing your order number, get your fingerprinting service done through a participating USPS location.
Check the fingerprinting hours of your USPS location, and show up during that time with a printed copy of your FBI payment confirmation email.
You should receive your FBI background check within a day or two. You can check the status by using the FBI link from the original email along with the PIN provided to you. When the results are ready, you should receive an email from the FBI. The FBI background check will either be attached in the email, or you could download it at the status page. The Apostille is not necessary for you as an EU citizen.
Back to Pre-Departure Requirements
Medical Certificate
Book a check-up with your doctor (not nurse, nurse practicioner, or anything other than an MD), and have the template filled out. Please, make sure that all the requirements of the form are completed. It is a bilingual form, so both the English and Spanish sections should be filled out. Follow the instructions carefully.

Instructions on page 2:
Written on letterhead paper from hospital´s/doctor’s office:
See a doctor (MD) and they will determine if you are of good health according to the International Health Regulation (2005). This PDF file can be sent electronically in order to be printed out on letterhead paper. The doctor may also use this sample as a guide to write his or her own certificate. Remember that it must specifically mention the International Health Regulations (2005). The doctor should then print out, sign, date and stamp the Medical Certificate.
Written on Template:
This template can also be signed and filled out by the doctor, with doctor´s stamp; without the stamp, the template is not valid. Therefore, if your doctor does not have a stamp, in order to be accepted, the doctor must write the information from the template to a letter with a letterhead of the hospital or doctor’s office, so it can be accepted at the Consulate.
Back to Pre-Departure Requirements
Completed EX-18 Form
Complete the form and sign it. Bring the original + a copy of your completed and signed form. The guide is included below.
EX-18 Form – If the link doesn’t work, please let me know and I’ll fix it.
Section 1: (You can leave the NIE section blank and just fill in the passport section)
The form from the link above is a little bit different. It says “DATOS DE LA PERSONA SOLICITANTE” in section 1. The boxes are the same. Copy the boxes.

Sexo H – Hombre and M – Mujer.
Estado civil is S for soltero, C for casado, V for viudo, D for divorciado, and Sp for separado.
Address needs to include all of the necessary information (escalera/bloque/whatever).
Section 2:
Leave Blank
Section 3:

I recommend you do not check the box under section 3. This will consent to all vital communications and notifications being sent online instead of by mail. If you do not have a digital certificate or cl@ve, you won’t be able to access these notifications.
Section 4:
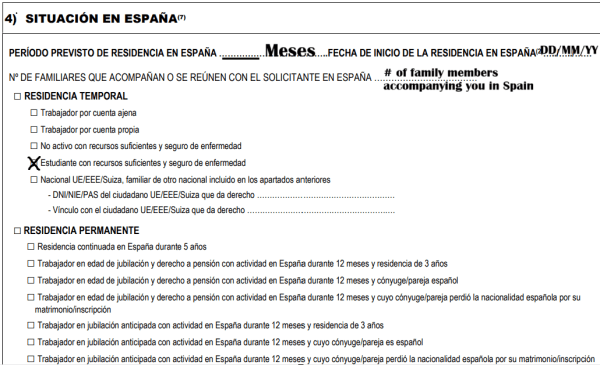
“Fecha de inicio de la residencia en Espana” is when you initiated your residence in Spain.
Most of you will put “0” for the next section regarding family members.
And lastly, even though we are paid, we aren’t workers. We are technically students on a stipend.

(city/town a date de month de year)
The last 2 boxes say “Signature of the EU citizen” and “Signature of the Applicant”. Unless you hired a lawyer (please don’t waste your money), it will be your signature both times.
Tasa 790-012
The Tasa Modelo is a tax form you have to fill out and pay at a bank branch or ATM. This form is used to pay for your appointment. I highly recommend going inside a bank branch to pay the tax form with exact cash (usually you don’t need exact cash, but some bank branches can be particular). This way you are guaranteed to get a stamped sheet back proving your payment for the appointment.
It’s also a good idea to get there before 11:00 a.m. as many banks stop offering this service at that time.
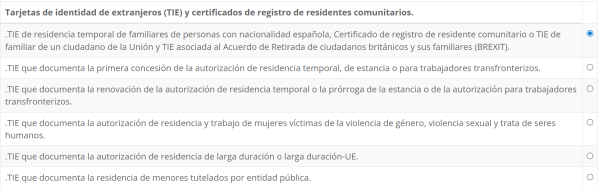
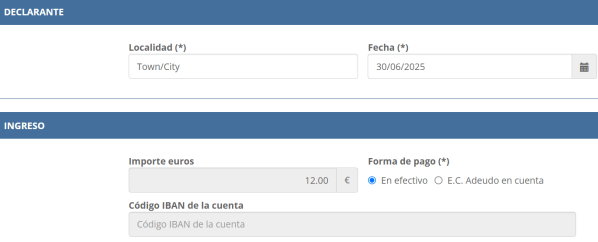
If you have a local Spanish bank account, use your bank branch. If you do not have a local Spanish bank account, you can still use a physical bank branch without issue (go before 11 am). I’ve had great luck with Caja Rural in the past. Just go up with your Tasa Modelo filled out, your ID (Passport), and your payment. To fill out the form, use the following link.


Quick Announcement:
Running this website takes time (and money), but you can support it at no cost to yourself.
When moving to Spain, you’ll need services like a bank account, money transfers, and a phone plan. I’m an affiliate for companies I personally recommend, and my referral links often include discounts for you.
Use them when setting up your life in Spain. You save money, the site earns a small commission, and everyone benefits.

Now, back to the guide.
After filling out the form, download the form and print it out. Make sure to sign it! Bring the form with exact cash to a bank branch and pay the fee there. Make sure you receive a stamped form in return. This is your proof that you paid the Tasa. Bring it to your appointment.
EU Passport or National ID + Copy
Bring your EU passport along with a copy of all of your passport pages (yes, all of them). They may only ask for only your BioData page, but they may also ask for all of them. If you do not have an EU passport, bring your National ID proving EU citizenship along with a copy of both sides.

Empadronamiento/Proof of Address
You may be requested to show proof of address in Spain. The most official way of doing this is with a certificate of Empadronamiento (registration with the town hall). You can also try using a rental contract or utility bill in your name instead.
Whenever I’ve been asked for my Empadronamiento, I have given the Volante de Empadronamiento every time, and I have never had any issues. You can find out about the Empadronamiento process in the link below.
The Volante de Empadronamiento is the receipt given to you when first applying for Empadronamiento. It will either be a stamped copy of your solicitud or a separate piece of paper printed with your Empadronamiento information. The official certificate takes about a month to process. If you want to be cautious, you can wait until you have the Certificado de Empadronamiento before attending your appointment.
People have been rejected for just submitting their volante, so play it safe if you can.

Carta de Nombramiento
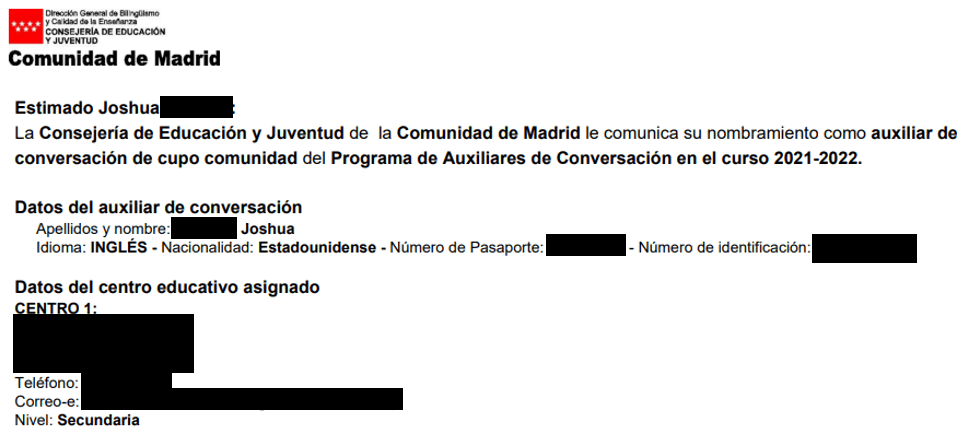
Print two copies of your Carta de Nombramiento. This gives justification as to why you are in Spain.
Get an Appointment
Getting an appointment is the most difficult part of this process. There are often no openings available, so DON’T BE PICKY! Make sure to constantly check for openings because the Oficina Extranjería periodically adds more availabilities.
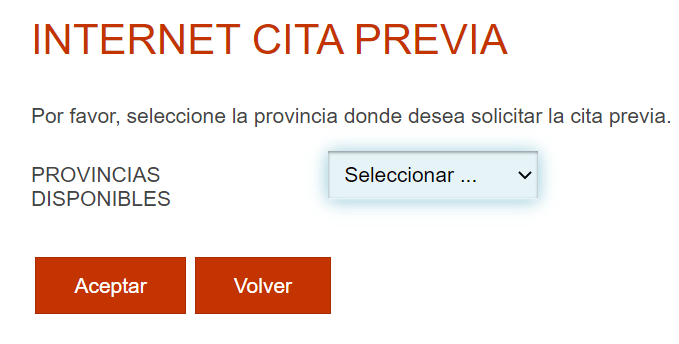
Step 1:
Choose the province THAT YOU LIVE IN.
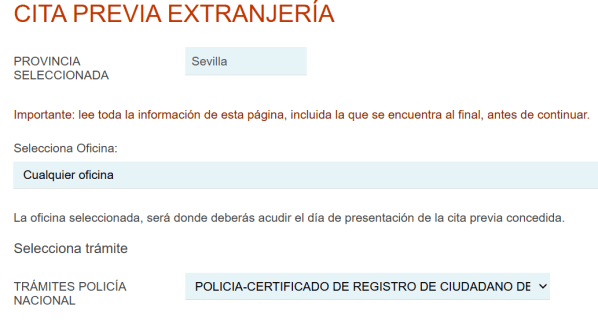
Step 2:
Provincia – The same as your previously selected choice.
Oficina – Cualquier oficina
TRÁMITES POLICÍA NACIONAL – Select this tab.
Do NOT select “TRÁMITES OFICINAS DE EXTRANJERÍA”.
“POLICIA Certificado de Registro de Ciudadano de la Unión Europea“
Step 3 and beyond: The following page has information about requirements for your appointment.
After clicking “Presentacion sin Cl@ve” and moving on to the next page, you will need to enter your information.

Add your personal information further down in the page.
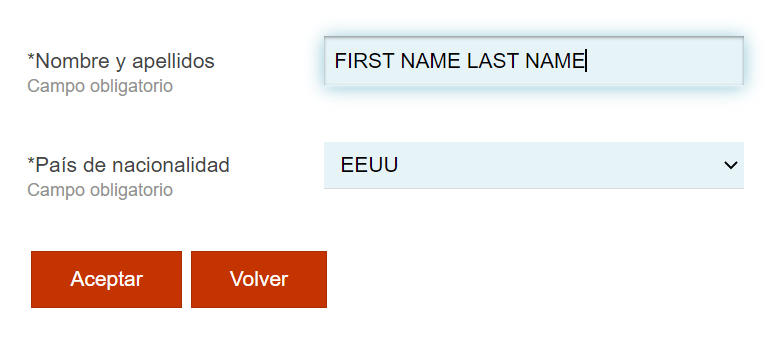
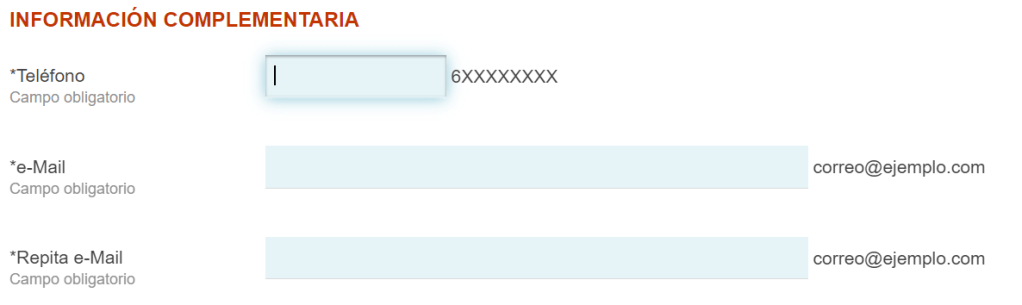
Hit accept and continue through the online forms. Add your contact information and continue.
In the next page, you can choose your appointment date and time.
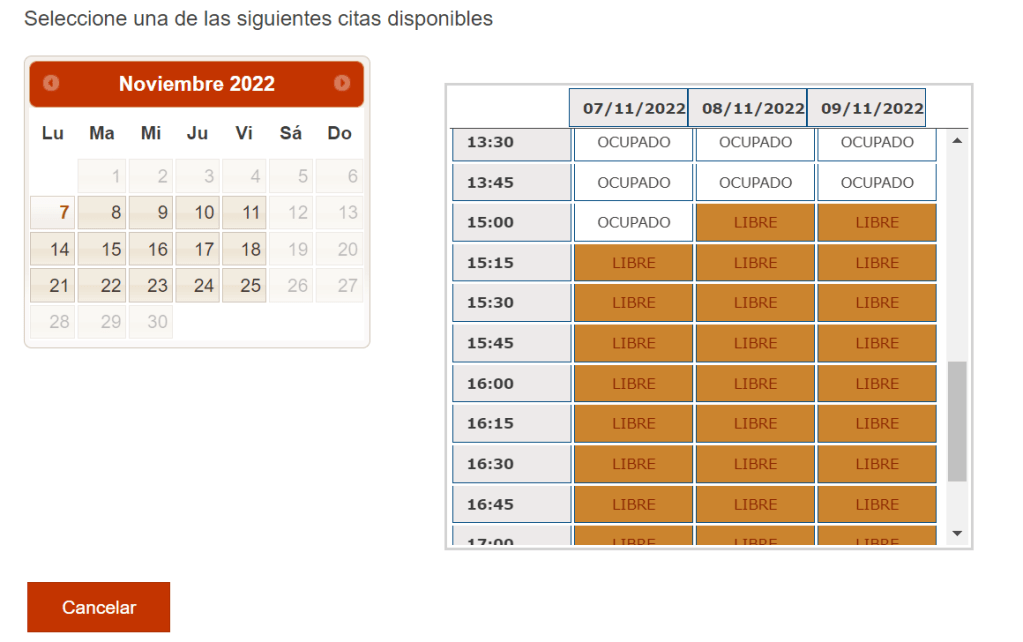
Once you choose an appointment, PRINT OUT the confirmation page and bring it to your appointment.
Bring all of your required documents and your appointment confirmation to your appointment. I always bring a pen with me to bureaucratic appointments in case I forgot to sign something. I also recommend carrying an organized folder with paperclips. Don’t be an unorganized mess!
- Carta de Nombramiento + extra copy
- EU Passport + Copy of all Pages/National ID + Copy
- Empadronamiento + copy
- Completed and signed EX-18 Form + copy
- Tasa 790-012 dutifully paid
- Appointment confirmation
Bring your phone in case you need google translate. Go to the correct office chosen in your appointment. Wait in line, and hand over all the required documents when it’s your turn. The officer will instruct you on what to do and give any other relevant information. Please ask questions if you don’t understand what he or she says during the appointment.
Once you are registered, you should also receive your NIE. Congratulations! Your next step is getting your TIE.
If you found the website useful, please Support the Page. Every little bit helps.
Back to Navigation
The information on http://www.residency2spain.com is provided in good faith and is intended for general informational purposes only. Residency2spain makes no guarantees regarding the accuracy, reliability, or completeness of the content. Any decisions you make based on the information found on this site are made at your own discretion and risk. Residency2spain is not liable for any loss or damage resulting from the use of this website.
Copyright © 2022 Residency2Spain All rights reserved.

